Crack Excel passwords with VBA
There is nothing more frustrating than finding out a previous employee has used passwords to protect an Excel file, and it turns out nobody else knows the password. Or maybe it’s worse when it’s your file, your password and you’ve forgotten it. Either way… you’re stuffed! However, before you give in, let me share some ideas on how to crack Excel passwords with VBA.
Download the example file
I recommend you download the example file for this post. Then you’ll be able to work along with examples and see the solution in action, plus the file will be useful for future reference.
![]()
Download the file: 0012 Remove passwords.zip
Did the download remove the worksheet, workbook, or VBA protection from your Excel file? If it did… why not buy me a coffee to say “Thanks” 🙂
Before we even start discussing how to remove passwords, we need to understand the different types of passwords within an Excel file. The removal approach will vary for each.
Contents
Setting different types of passwords
There are five different passwords within Excel:
- File open
- File modify
- Workbook protection
- Worksheet protection
- VBA project
Each of them is applied differently and serves different purposes. Let’s look at each in turn.
File open passwords
The file open password prevents an Excel workbook from opening until the password is entered.
- Click File -> Save As -> More Options…
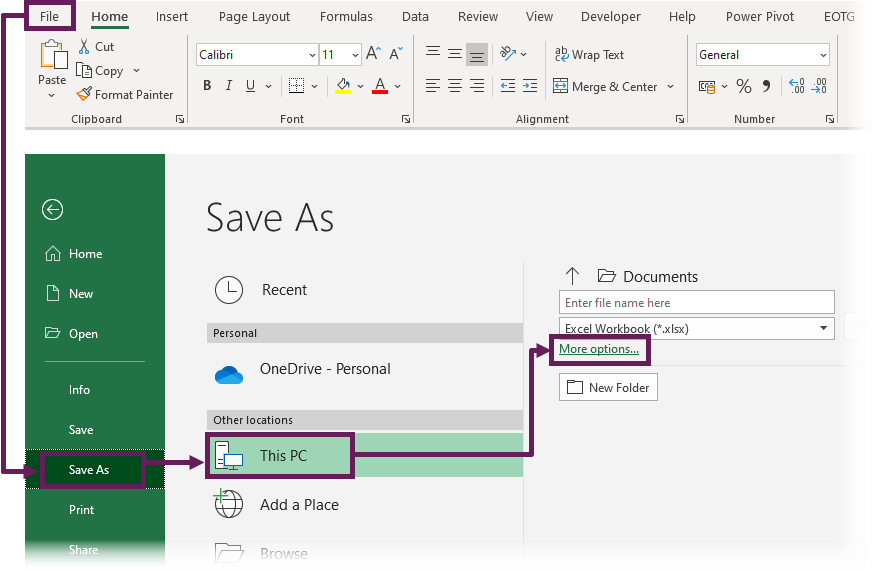
- <Next, in the Save As dialog box, click Tools -> General Options…
- The General Options box appears. Enter a password in the password to open box, then click OK.
.
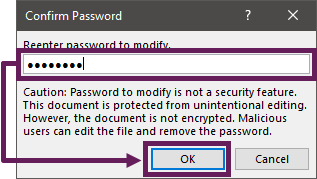
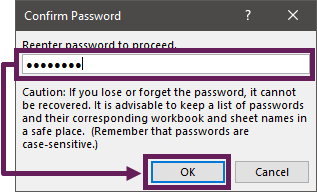
- In the Confirm Password window, re-enter the password and click OK.

- Finally, enter a file name and click Save in the Save As window.

The file open password has now been set. A user cannot open the workbook until the password has been entered.
Warning Message
Did you notice the warning message which appeared when setting the password?
Caution: If you lose or forget the password, it cannot be recovered. It is advisable to keep a list of passwords and their corresponding workbook and sheet names in a safe place. (Remember that passwords are case-sensitive.)
This is good advice. As these passwords cannot be easily recovered.
File modify passwords
The file modify password prevents the workbook from being changed until a password has been entered. Some of the steps are the same as the file open password, but they are repeated here for completeness.
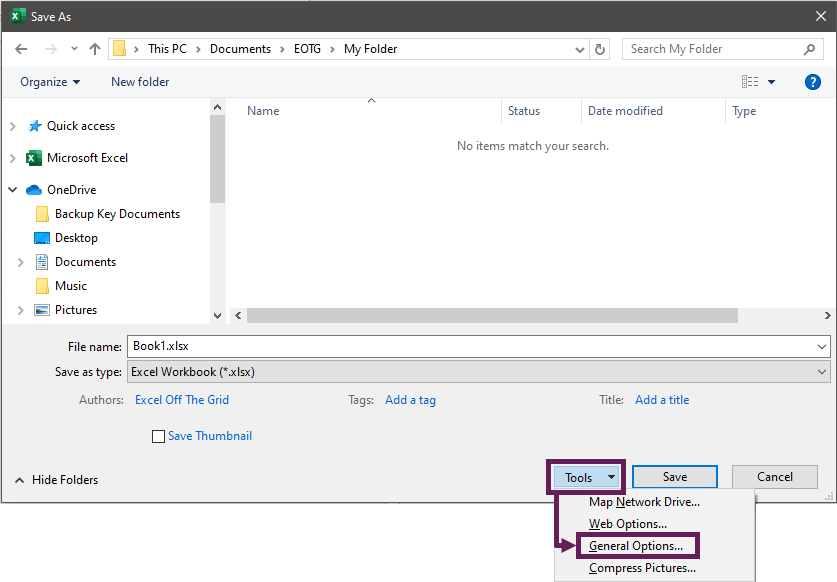
- Click File -> Save As -> More Options…
- The Save As window appears, click Tools -> General Options…
- The General Options box appears. Enter a password in the password to modify box, then click OK.
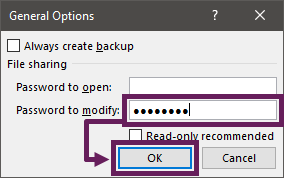
- In the Confirm Password window, re-enter the password and click OK.
- Finally, click Save on the Save As window.
The File Modify password has now been set. A user can open the workbook, but it is set as read-only unless they enter the password.
Warning Message
Did you notice the warning message this time?
Caution: Password to modify is not a secure feature. This document is protected from unintentional editing. However, the document is not encrypted. Malicious users can edit the file and remove the password.
Did you see the difference in tone of the warning message? Even Microsoft recognize that this password is not secure. We will cover how to remove this password later in the post.
Worksheet protection passwords
Worksheet protection passwords prevent specific cells from being changed. A user can open and interact with the worksheet but is restricted in the activities they can do.
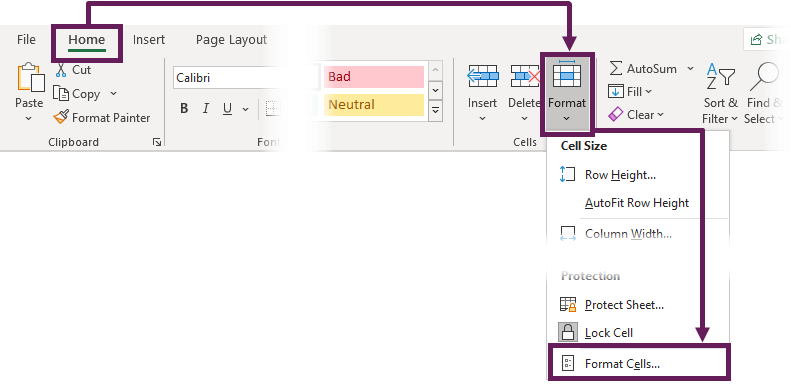
- Start by setting the lock property of a cell or range of cells. Select some cells then click Home -> Format -> Format Cells from the ribbon (or the shortcut is Ctrl + 1)
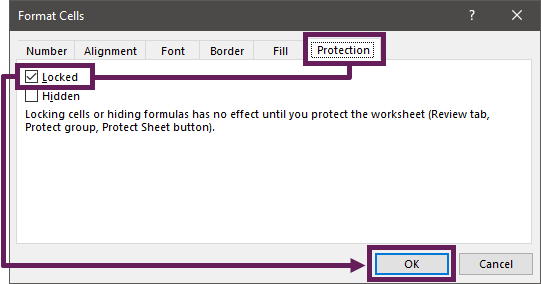
- The Format Cells window opens. Select the Protection tab, tick or untick the Locked option as required, then click OK.
- To apply the protection, click Review -> Protect Sheet.

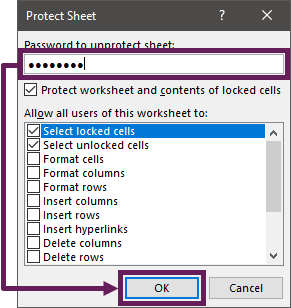
- The Protect Sheet window opens. Enter a password, and use the tick boxes to set the protection to be applied, then click OK.
- In the Confirm Password window, re-enter the password and click OK again.
Done. The worksheet is now protected. If a user tries to make changes to a locked cell, an error message will appear:

Warning Message
When setting the password, the warning message is the same as the file open password.
Caution: If you lose or forget the password, it cannot be recovered. It is advisable to keep a list of passwords and their corresponding workbook and sheet names in a safe place. (Remember that passwords are case-sensitive.)
This would imply it is the same level of security as the file open password, which isn’t true. As you’ll see later in this post, we can remove this password (it’s not as secure as they make it seem).
Workbook protection passwords
Workbook protection is applied in a similar way to worksheet protection, but with fewer options. It prevents users from changing the structure of a workbook, such as creating or renaming worksheets.
- Click Review -> Protect workbook from the ribbon.

- The Protect Structure window opens. Enter a password, then click OK.
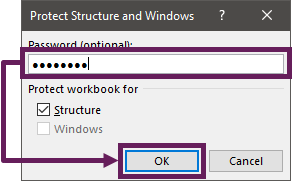
Prior to Excel 2013, both the Structure and Window options were available. Due to the Single Document Interface introduced in Excel 2013, the Windows option is no longer relevant and greyed-out. - In the Confirm Password window, re-enter the password and click OK.
The workbook structure is now protected.
Warning Message
Did you notice the warning message again?
Caution: If you lose or forget the password, it cannot be recovered. It is advisable to keep a list of passwords and their corresponding workbook and sheet names in a safe place. (Remember that passwords are case-sensitive.)
The good news is that it’s the same security as the worksheet protection, so we can crack the protection.
VBA project passwords
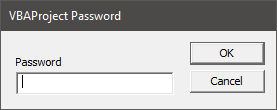
VBA project passwords prevent users from viewing or changing the code of a VBA Project.
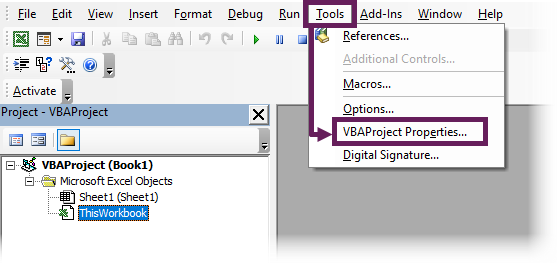
- In the Visual Basic Editor window, click Tools -> VBA Project Properties…
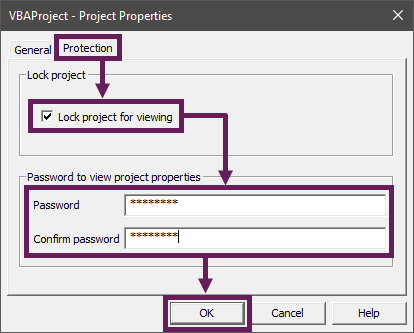
- The VBA Project – Project Properties window opens. Select the Protection tab, tick the Lock project for viewing, enter and confirm a password, then click OK.
The VBA project is now protected. Close and re-open the workbook. When expanding the VBA project, the user is presented with a box to enter the password.
How Excel handles passwords
Whilst we have considered five different types of passwords, a standard xlsx file handles these in only three ways:
- XML file code
- Encryption
- VBA Project binary
NOTES:Excel files can be saved in many different spreadsheet file formats. The most common of which are:
- .xlsx – The standard file format which primarily compressed XML files
- .xls – The legacy file format which was replaced in Excel 2007
- .xlsb – Stores the Excel file as compressed binary files. It is a proprietary file format, which is generally not supported outside of Excel.
- .xlsm – A .xlsx file which contains a macro
- .xlam – A .xlsm file saved with a setting identifying it as an add-in
The remainder of this post only covers the xlsx, xlsm and xlam file formats.
XML file code
From Excel 2007, the standard file format changed to be an xlsx format. This means the file is built using mostly structured XML formatted files. That might sound confusing, but don’t worry. All you need to know is that with a bit of knowledge we can edit XML code ourselves
Encryption
From Excel 2007, Microsoft’s level of protection increased significantly. When saving a file with the file open password, Excel applies encryption.
VBA Project binary
VBA Projects are stored as binary files within the Excel file format structure. The passwords, or the encrypted versions of those passwords are stored within the binary file itself.
Removing each type of password
Since the passwords are stored in different ways, the method of removing them is also different.
Crack the file open (encrypted) password
For this first password method, it’s bad news. The only way I know of, is a brute force attack (i.e., trying every combination of every letter). There are third-party software tools and services which can perform this attack at higher speed. The more complex the password, the longer it will take to crack.
Thankfully, I have never needed to rely on these services. Therefore, I cannot comment on the quality of any third party offerings.
Crack the modify file password
We don’t even need to crack the file modify password. The password can be removed by re-saving the file with a new name.
That’s it, nice and simple.
Cracking worksheet and workbook passwords
Excel does not store the password within the XML file. It uses an algorithm to create an adjusted code; then it stores the adjusted code within the file. The protection is removed when any password put through the algorithm creates the same result.
Thankfully, we do not have to try brute force, because we can try other means.
Crack the workbook and worksheet passwords manually
I keep talking about the XML file and the file structure, let’s have a look at it. You’ll see it’s not too scary.
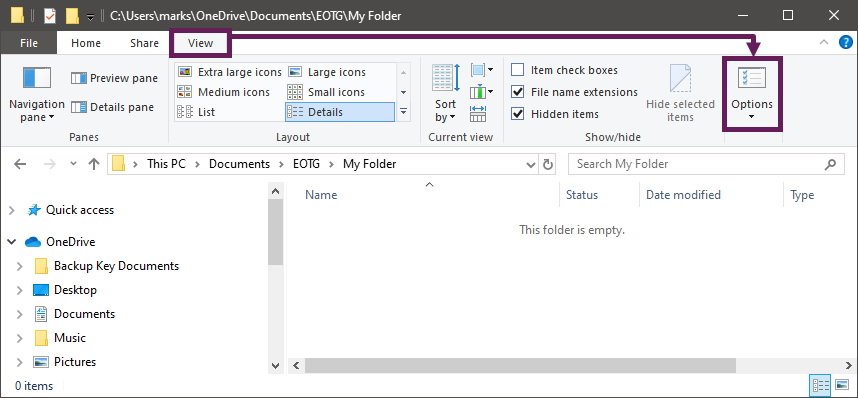
- Make sure the file extensions are visible on your computer. On any Windows folder, click View -> Options.
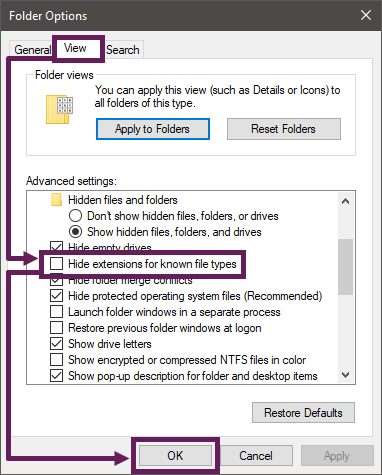
- In the Folder Options window, click the View tab, remove the tick from hide extensions for known file types, then click OK.
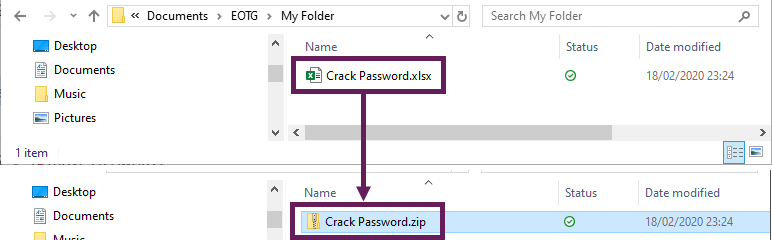
- It is now possible to see the .xlsx file extension. Rename the file to include the .zip extension.
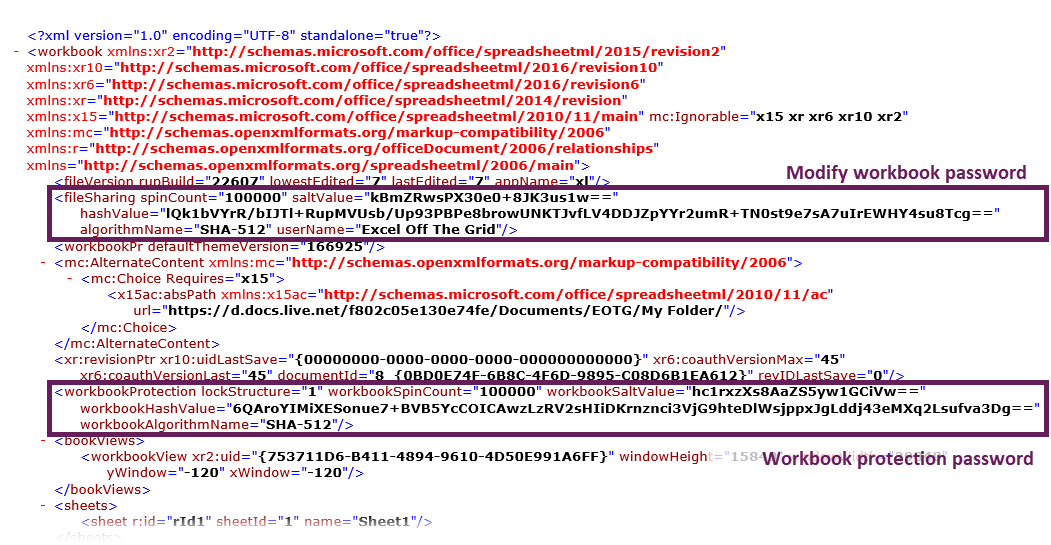
- Open the zip file, then navigate to the \xl\workbooks.xml file. The highlighted section below show where the modify and workbook passwords are coded:
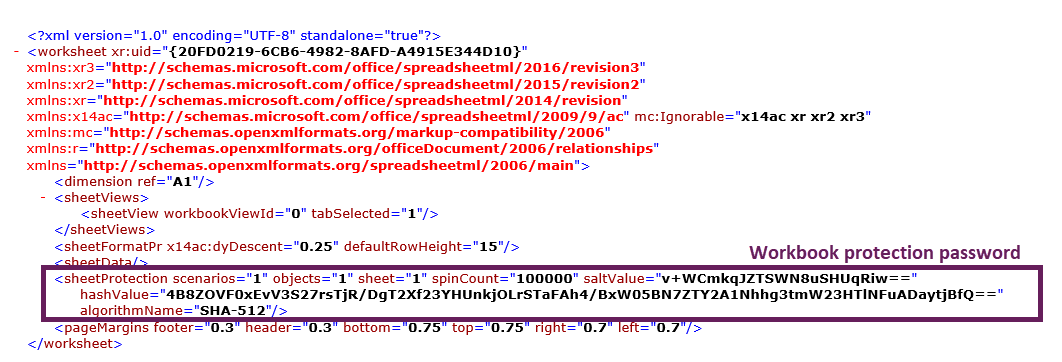
- Next, navigate to \xl\worksheets\sheet1.xml. The highlighted section below shows where the worksheet protection password code is:
- We could edit these text files to remove this code, insert the file back into the zip file, then finally, rename the file back to an xlsx.
We need to adjust the XML file, then insert it back into the zip folder in the same location. Don’t unzip the folder completely, as the zipping and unzipping process can make the Excel file unusable, depending on your zip software.
Alternatively, we could use a macro to remove the code automatically.
Crack the workbook, worksheet and modify passwords with a macro
Open a new Excel workbook and copy the following code into a standard module within the Visual Basic Editor.
Sub RemoveProtection()

Dim dialogBox As FileDialog
Dim sourceFullName As String
Dim sourceFilePath As String
Dim sourceFileName As String
Dim sourceFileType As String
Dim newFileName As Variant
Dim tempFileName As String
Dim zipFilePath As Variant
Dim oApp As Object
Dim FSO As Object
Dim xmlSheetFile As String
Dim xmlFile As Integer
Dim xmlFileContent As String
Dim xmlStartProtectionCode As Double
Dim xmlEndProtectionCode As Double
Dim xmlProtectionString As String

'Open dialog box to select a file
Set dialogBox = Application.FileDialog(msoFileDialogFilePicker)
dialogBox.AllowMultiSelect = False
dialogBox.Title = "Select file to remove protection from"

If dialogBox.Show = -1 Then
    sourceFullName = dialogBox.SelectedItems(1)
Else
    Exit Sub
End If

'Get folder path, file type and file name from the sourceFullName
sourceFilePath = Left(sourceFullName, InStrRev(sourceFullName, "\"))
sourceFileType = Mid(sourceFullName, InStrRev(sourceFullName, ".") + 1)
sourceFileName = Mid(sourceFullName, Len(sourceFilePath) + 1)
sourceFileName = Left(sourceFileName, InStrRev(sourceFileName, ".") - 1)

'Use the date and time to create a unique file name
tempFileName = "Temp" & Format(Now, " dd-mmm-yy h-mm-ss")

'Copy and rename original file to a zip file with a unique name
newFileName = sourceFilePath & tempFileName & ".zip"
On Error Resume Next
FileCopy sourceFullName, newFileName

If Err.Number <> 0 Then
    MsgBox "Unable to copy " & sourceFullName & vbNewLine _
        & "Check the file is closed and try again"
    Exit Sub
End If
On Error GoTo 0

'Create folder to unzip to
zipFilePath = sourceFilePath & tempFileName & "\"
MkDir zipFilePath

'Extract the files into the newly created folder
Set oApp = CreateObject("Shell.Application")
oApp.Namespace(zipFilePath).CopyHere oApp.Namespace(newFileName).items

'loop through each file in the \xl\worksheets folder of the unzipped file
xmlSheetFile = Dir(zipFilePath & "\xl\worksheets\*.xml*")
Do While xmlSheetFile <> ""

    'Read text of the file to a variable
    xmlFile = FreeFile
    Open zipFilePath & "xl\worksheets\" & xmlSheetFile For Input As xmlFile
    xmlFileContent = Input(LOF(xmlFile), xmlFile)
    Close xmlFile

    'Manipulate the text in the file
    xmlStartProtectionCode = 0
    xmlStartProtectionCode = InStr(1, xmlFileContent, "<sheetProtection")

    If xmlStartProtectionCode > 0 Then

        xmlEndProtectionCode = InStr(xmlStartProtectionCode, _
            xmlFileContent, "/>") + 2 '"/>" is 2 characters long
        xmlProtectionString = Mid(xmlFileContent, xmlStartProtectionCode, _
            xmlEndProtectionCode - xmlStartProtectionCode)
        xmlFileContent = Replace(xmlFileContent, xmlProtectionString, "")

    End If

    'Output the text of the variable to the file
    xmlFile = FreeFile
    Open zipFilePath & "xl\worksheets\" & xmlSheetFile For Output As xmlFile
    Print #xmlFile, xmlFileContent
    Close xmlFile

    'Loop to next xmlFile in directory
    xmlSheetFile = Dir

Loop

'Read text of the xl\workbook.xml file to a variable
xmlFile = FreeFile
Open zipFilePath & "xl\workbook.xml" For Input As xmlFile
xmlFileContent = Input(LOF(xmlFile), xmlFile)
Close xmlFile

'Manipulate the text in the file to remove the workbook protection
xmlStartProtectionCode = 0
xmlStartProtectionCode = InStr(1, xmlFileContent, "<workbookProtection")
If xmlStartProtectionCode > 0 Then

    xmlEndProtectionCode = InStr(xmlStartProtectionCode, _
        xmlFileContent, "/>") + 2 ''"/>" is 2 characters long
    xmlProtectionString = Mid(xmlFileContent, xmlStartProtectionCode, _
        xmlEndProtectionCode - xmlStartProtectionCode)
    xmlFileContent = Replace(xmlFileContent, xmlProtectionString, "")

End If

'Manipulate the text in the file to remove the modify password
xmlStartProtectionCode = 0
xmlStartProtectionCode = InStr(1, xmlFileContent, "<fileSharing")
If xmlStartProtectionCode > 0 Then

    xmlEndProtectionCode = InStr(xmlStartProtectionCode, xmlFileContent, _
        "/>") + 2 ''"/>" is 2 characters long
    xmlProtectionString = Mid(xmlFileContent, xmlStartProtectionCode, _
        xmlEndProtectionCode - xmlStartProtectionCode)
    xmlFileContent = Replace(xmlFileContent, xmlProtectionString, "")

End If

'Output the text of the variable to the file
xmlFile = FreeFile
Open zipFilePath & "xl\workbook.xml" & xmlSheetFile For Output As xmlFile
Print #xmlFile, xmlFileContent
Close xmlFile

'Create empty Zip File
Open sourceFilePath & tempFileName & ".zip" For Output As #1
Print #1, Chr$(80) & Chr$(75) & Chr$(5) & Chr$(6) & String(18, 0)
Close #1

'Move files into the zip file
oApp.Namespace(sourceFilePath & tempFileName & ".zip").CopyHere _
oApp.Namespace(zipFilePath).items
'Keep script waiting until Compressing is done
On Error Resume Next
Do Until oApp.Namespace(sourceFilePath & tempFileName & ".zip").items.Count = _
    oApp.Namespace(zipFilePath).items.Count
    Application.Wait (Now + TimeValue("0:00:01"))
Loop
On Error GoTo 0

'Delete the files & folders created during the sub
Set FSO = CreateObject("scripting.filesystemobject")
FSO.deletefolder sourceFilePath & tempFileName

'Rename the final file back to an xlsx file
Name sourceFilePath & tempFileName & ".zip" As sourceFilePath & sourceFileName _
& "_" & Format(Now, "dd-mmm-yy h-mm-ss") & "." & sourceFileType

'Show message box
MsgBox "The workbook and worksheet protection passwords have been removed.", _
vbInformation + vbOKOnly, Title:="Password protection"

End Sub
Run the macro above. Select the file which contains the passwords to be removed, then click OK. The macro will create a new file with the modify, workbook and worksheet passwords removed.
Common VBA error messages and solutions
If you get the following error messages, the reason could be one of the following:
Run-time error ’53’: file not found:
- The workbook is an xlsb file type; the macro only works on the xlsx file type.
Run-time error ’76’: file not found:
- The workbook is an xls file type; the macro only works on the xlsx file type.
- The workbook has a file open password applied.
Run-time error ’91’: Object variable or With block variable not set:
- You are running the macro on a Mac, instead of a PC.
Crack the VBA project binary password
Finally, we get to the VBA project binary passwords. Many tutorials suggest using a HEX editor to remove the password. But there is a better and simpler way.
There is an amazing macro which confuses the Visual Basic Editor into believing a valid password has been entered.
I could not have coded this macro in a million years. I don’t claim to be the author of this code, I have copied it from here: https://stackoverflow.com/questions/1026483/is-there-a-way-to-crack-the-password-on-an-excel-vba-project
If you are the copyright owner of the original code and wish me to remove the code below, please let me know.
Copy all the code below into a standard VBA module, then run the VBAUnprotected macro (the one at the bottom).
Private Const PAGE_EXECUTE_READWRITE = &H40

Private Declare PtrSafe Sub MoveMemory Lib "kernel32" Alias "RtlMoveMemory" _
    (Destination As LongPtr, Source As LongPtr, ByVal Length As LongPtr)

Private Declare PtrSafe Function VirtualProtect Lib "kernel32" (lpAddress As LongPtr, _
    ByVal dwSize As LongPtr, ByVal flNewProtect As LongPtr, lpflOldProtect As LongPtr) As LongPtr

Private Declare PtrSafe Function GetModuleHandleA Lib "kernel32" (ByVal lpModuleName As String) As LongPtr

Private Declare PtrSafe Function GetProcAddress Lib "kernel32" (ByVal hModule As LongPtr, _
    ByVal lpProcName As String) As LongPtr

Private Declare PtrSafe Function DialogBoxParam Lib "user32" Alias "DialogBoxParamA" (ByVal hInstance As LongPtr, _
    ByVal pTemplateName As LongPtr, ByVal hWndParent As LongPtr, _
    ByVal lpDialogFunc As LongPtr, ByVal dwInitParam As LongPtr) As Integer

Dim HookBytes(0 To 11) As Byte
Dim OriginBytes(0 To 11) As Byte
Dim pFunc As LongPtr
Dim Flag As Boolean

Private Function GetPtr(ByVal Value As LongPtr) As LongPtr
GetPtr = Value
End Function

Public Sub RecoverBytes()
If Flag Then MoveMemory ByVal pFunc, ByVal VarPtr(OriginBytes(0)), 12
End Sub

Public Function Hook() As Boolean

Dim TmpBytes(0 To 11) As Byte
Dim p As LongPtr, osi As Byte
Dim OriginProtect As LongPtr

Hook = False

#If Win64 Then
    osi = 1
#Else
    osi = 0
#End If

pFunc = GetProcAddress(GetModuleHandleA("user32.dll"), "DialogBoxParamA")

If VirtualProtect(ByVal pFunc, 12, PAGE_EXECUTE_READWRITE, OriginProtect) <> 0 Then

    MoveMemory ByVal VarPtr(TmpBytes(0)), ByVal pFunc, osi+1
    If TmpBytes(osi) <> &HB8 Then

        MoveMemory ByVal VarPtr(OriginBytes(0)), ByVal pFunc, 12

        p = GetPtr(AddressOf MyDialogBoxParam)

        If osi Then HookBytes(0) = &H48
        HookBytes(osi) = &HB8
        osi = osi + 1
        MoveMemory ByVal VarPtr(HookBytes(osi)), ByVal VarPtr(p), 4 * osi
        HookBytes(osi + 4 * osi) = &HFF
        HookBytes(osi + 4 * osi + 1) = &HE0

        MoveMemory ByVal pFunc, ByVal VarPtr(HookBytes(0)), 12
        Flag = True
        Hook = True
    End If
End If

End Function

Private Function MyDialogBoxParam(ByVal hInstance As LongPtr, _
    ByVal pTemplateName As LongPtr, ByVal hWndParent As LongPtr, _
    ByVal lpDialogFunc As LongPtr, ByVal dwInitParam As LongPtr) As Integer

If pTemplateName = 4070 Then
    MyDialogBoxParam = 1
Else
    RecoverBytes
    MyDialogBoxParam = DialogBoxParam(hInstance, pTemplateName, _
        hWndParent, lpDialogFunc, dwInitParam)
    Hook
End If

End Function


''''RUN THE CODE BELOW''''
Sub VBAUnprotected()

If Hook Then
    MsgBox "VBA Project is unprotected!", vbInformation, "*****"
End If

End Sub
Please note, the macro only works with passwords created using Excel’s standard VBA password feature. VBA projects protected with Unviewable+ (or similar software) cannot be cracked.
Conclusion
There you have it, that’s how to crack Excel passwords with VBA.
For worksheet, workbook, modify and VBA projects, there is a solution.
If you were hoping to get instructions to crack the file open password, then I’m sorry, I don’t have an easy solution. Try investigating a brute force attack method.
Link: https://exceloffthegrid.com/removing-cracking-excel-passwords-with-vba/