Để xóa thư mục rỗng cứng đầu, bạn hãy dùng lệnh rmdir /s /q [đường dẫn] trong Command Prompt, khởi động lại máy, hoặc dùng phần mềm chuyên dụng như WinRAR/7-Zip để xóa ngang qua giao diện nén. [1, 2, 3]
Các bước xử lý chi tiết
Khởi động lại máy tính: Tắt các tiến trình ngầm đang bị kẹt treo nhận diện nhầm thư mục.
Đây là lỗi rất phổ biến trên Windows 11, đặc biệt với các file `.chm` được tải từ Internet hoặc copy từ máy khác. Khung mục lục (Contents) vẫn hiện nhưng phần bên phải trắng hoàn toàn như hình bạn gửi.
(làm cách 4 thành công)
Hãy thử lần lượt các cách sau:
### Cách 1. Unblock file CHM (thường giải quyết được 90% trường hợp)
1. Đóng file `.chm`.
2. Chuột phải vào file `.chm` → **Properties**.
3. Nếu phía dưới có:
```
Security:
This file came from another computer...
[ ] Unblock
```
thì tích **Unblock** → **Apply** → **OK**.
Mở lại file.
---
### Cách 2. Đưa file ra ổ cứng nội bộ
Windows Help không thích đọc CHM từ:
* Network Drive
* OneDrive
* NAS
* USB
* File ZIP chưa giải nén
Ví dụ:
❌
```
Downloads\Tools.zip\help.chm
```
hoặc
```
\\Server\Share\help.chm
```
Hãy copy tới:
```
C:\Temp\NET.chm
```
rồi mở lại.
---
### Cách 3. Gỡ Mark of the Web bằng PowerShell
Mở PowerShell:
```powershell
Unblock-File "C:\Temp\NET.chm"
```
hoặc
```powershell
Get-ChildItem *.chm | Unblock-File
```
---
### Cách 4. Kiểm tra Registry (Windows chặn CHM)
Mở Registry:
```
HKEY_LOCAL_MACHINE
SOFTWARE
Microsoft
HTMLHelp
1.x
```
Nếu không có khóa:
```
ItssRestrictions
```
thì tạo.
Trong đó tạo DWORD:
```
MaxAllowedZone = 1
```
Nếu vẫn không được, thử:
```
MaxAllowedZone = 3
```
Sau đó mở lại CHM.
---
### Cách 5. Đăng ký lại HTML Help
Mở CMD (Run as Administrator):
```cmd
regsvr32 %windir%\system32\hhctrl.ocx
```
Nếu Windows 64-bit:
```cmd
regsvr32 C:\Windows\System32\hhctrl.ocx
```
---
### Cách 6. Kiểm tra Internet Explorer Mode
CHM sử dụng engine rất cũ (MSHTML/IE).
Mở:
```
Optional Features
```
Kiểm tra:
```
Internet Explorer Mode
```
hoặc
```
Internet Explorer 11
```
nếu có thì bật lại.
---
### Cách 7. Thử mở bằng hh.exe
Thay vì double click:
```
Win + R
```
gõ:
```cmd
hh.exe "C:\Temp\NET.chm"
```
---
## Nếu chỉ một số trang trắng
Có khả năng file CHM bị lỗi.
Thử:
```
7-Zip
```
→ Open archive
Nếu thấy:
```
#SYSTEM
index.hhk
toc.hhc
*.htm
```
thì giải nén thử xem các file HTML có mở được không.
Sometimes you may want to prevent an application from accessing the Internet. This tutorial gives a step-by-step guide to teach you how to block a program with Windows firewall in Windows 10.
Normally you would want your applications to have free access to the network. However, no matter for what reason, you wish to block a program from accessing the Internet, you can check the step-by-step guide below to block program with Windows firewall in Windows 10.
How to Block a Program with Windows Firewall Windows 10
Step 1. Open Windows Firewall window
You can click Start, and type Windows Defender Firewall. Choose the top result to open Windows Defender Firewall.
You can also click Start, type control panel and choose the top result to open Windows Control Panel. Then click System & Security -> Windows Defender Firewall to open Windows Defender Firewall.
Step 2. Click Advanced settings
In the Windows Defender Firewall, you can click Advanced settings to enter into Windows Defender Firewall with Advanced Security app.
Step 3. Enter into Firewall rule creation window
Next you can click Outbound Rules in the left column and it will display all existing outbound Windows firewall rules in middle window.
In the right Outbound Rules Actions column, you can click New Rule option to open a new window in which you can create a new Firewall rule by your own.
Step 4. Create a new Firewall rule
In the new window, you can choose “What type of rule would you like to create?”
You can click Program to get ready to rule controls connections for a program, and click Next.
Step 5. Select the target program
You can tick This program path and click Browse to find path of the target program you want to block.
You can click This PC in the left column, select the hard drive, and open the program’s folder and select the target program.
If you open the program in Firewall, Windows will restructure the path of the file. You can avoid this problem by manually coping and pasting the file path to the box.
Click the address bar to copy the path of the program, and paste it to the box. Please do contain the app’s name and extension at the end of the path.
Step 6. Name the Firewall rule
You can click Next button three times, and input a name for the new Firewall rule. Then click Finish button to create the new Firewall rule to block the program with Windows Firewall in Windows 10 and prevent the program from accessing the Internet.
Step 1. You can click Start and type Windows Defender Firewall. Choose Windows Defender Firewall to open it.
Step 2. Click Allow an app or feature through Windows Firewall in the left column. And click Change settings.
Step 3. Find the target program you want to block. If you can’t find the program in the list, you can click Allow another app…-> Browse, locate the program and open it, select the program name and click Add to add it to the list.
Step 4. Make sure the target program is not checked in the left. If a program is not checked, then it means Windows Firewall already blocks the program. Finally, click OK to save the changes and prevent the program from running on your Windows 10 computer.
Bottom Line
With the step-by-step guide above, hope you can easily block a program with Windows Firewall in Windows 10 now.
Đôi khi bạn muốn một khởi động nhanh một ứng dụng nào đó mà không phải truy cập vàoStart Menu, bạn có thể pin nó lênQuicklaunch, dán ra desktop…nhưng còn một cách thú vị hơn nhiều, đó là đưa nó lên menu ngữ cảnh Desktop của windows (right-clickmenu). Sau đây tôi sẽ hướng dẫn các bạn một mẹo vặt này. :). Phải nói rằng tôi mới chỉ thử nó ởcontext-menucủa Desktop. Bài viết này sẽ hướng dẫn bạn thêm ứng dụngGoogle Chromevào trình đơn ngữ cảnh, bạn có thể hoàn toàn thêm vào một ứng dụng ưa thích của mình.
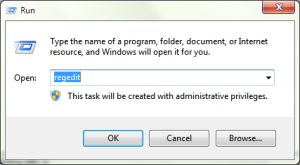
Đầu tiên truy cập vào trình chỉnh sửa Registry (regedit) thông qua việc tìm kiếm cụm từ regedit trong Start Menu hoặc gõ vào Run…
Cửa sổ Regedit mở ra, hãy duyệt theo khóa sau: HKEY_CLASSES_ROOT\Directory\Background\shell. Nếu bạn ở đúng vị trí, màn hình sẽ hiển thị như dưới đây.
Tiếp theo, ta sẽ tạo một khóa bên trong khóa shell (tương tự như cmd). Click chuột phải vào khóa shell, chọn New>Key. Đặt tên cho khóa mới tạo ra, ở đây ta đặt là Google Chrome (Do tên ứng dụng ta muốn thêm vào thôi).
Thêm vào một khóa mới bên dưới khóa shell
Trong panel bên phải, click double vào khóa (Default), nhập vào ô Value giá trị “Google Chrome” (không có “”). Một mẹo nhỏ là nếu bạn muốn sử dụng phím Alt kết hợp với một phím nào đó để mở nhanh ứng dụng thì ta có thể đặt ký tự & vào sát chữ cái muốn đặt. Ví dụ ở đây tôi muốn Alt + G thì sẽ đặt tên trong Value là “&Google Chrome”. Điều này cũng không hữu ích lắm :).
Tiếp theo, ta sẽ tạo ra một command để khởi động ứng dụng khi bạn click chuột vào đó. Ở khóa Google Chrome, click chuột phải, chọn New>Key. Đặt tên cho khóa mới là command.
Bây giờ, chúng ta sẽ copy đường dẫn đầy đủ của Google Chrome và dán vào Value của khóa (Default) ở Panel bên phải. Với một số ứng dụng thì chỉ đơn giản nằm trong Program Files, nhưng Google Chrome thì không như vậy. Mở Start Menu và tìm đến chương trình Google Chrome, click chuột phải và chọn Properties.
Cửa sổ Properties hiện ra, bạn copy dòng chữ trong Target, và dán vào Value ở trên.
Bây giờ bạn có thể xem thành quả của mình được rồi :).
Bạn hoàn toàn có thể thay thế bằng chương trình khác. Nếu bạn muốn xóa nó đi thì chỉ cần xóa toàn bộ khóa Google Chrome đã tạo ở trên. Have fun
Chú ý:
++Click phải chuột vào mục command của Key "Sublime Text" tạo mới cho menu context. Tạo mới New/Expandable String Value
Modify vào giá trị (Default): "C:\Program Files\Sublime Text 2.1\sublime_text.exe" "%1"
++Trong mục "Sublime Text" tạo mới 1 giá trị Expandable String Value với Name là "Icon" và Value là "C:\Program Files\Sublime Text 2.1\sublime_text.exe" để tạo Icon chương trình trên Context Menu
Cách thêm một mục vào menu phím phải chuột trên Windows
Bạn có muốn truy cập nhanh tiện ích hệ thống ngay từ trình đơn chuột phải mà không phải mở qua nhiều bước, Easy Context Menu (ECM) sẽ giúp bạn thực hiện điều này. ECM còn cung cấp nhiều tiện ích khác mà bạn có thể thêm vào, chỉnh sửa, sắp xếp tùy chọn,… dễ dàng.
Phần mềm tương thích Windows 10, Windows 8.1, Windows 8, Windows 7, Windows Vista, Windows XP (32-bit & 64-bit). Bạn tải phiên bản mới v1.6 tại đây (https://www.sordum.org/7615/easy-context-menu-v1-6/comment-page-17/#comment-33788) (dung lượng 1,5 MB).
1. Cách thêm tiện ích vào menu ngữ cảnh:
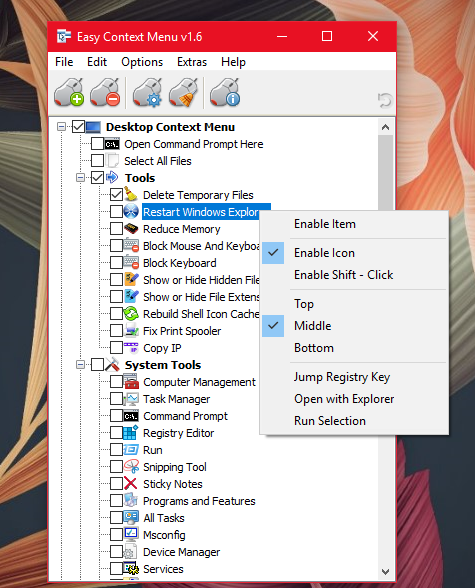
ECM là phần mềm portable nên sử dụng không cần cài đặt. Vào chương trình, bạn sẽ nhìn thấy các mục: Desktop Context Menu, My Computer Context Menu, Drives Context Menu, Folder Context Menu, File Context Menu, EXE file Context Menu. Tương ứng bạn được thêm các tùy chọn vào menu ngữ cảnh trên desktop, My Computer, ổ đĩa, thư mục, tập tin exe.
Bên trong mỗi mục như vậy là nhiều tiện ích như: Delete Temporary Files (xóa tập tin tạm), Reduce Memory (tối ưu bộ nhớ), Block mouse and keyboard (khóa chuột và bàn phím), Copy IP (sao chép IP máy tính), Change icon (đổi biểu tượng cho ứng dụng), Block Access (chặn truy cập), Add to Firewall (chặn ứng dụng với tường lửa Windows Firewall),… và các tùy chọn mở tiện ích hệ thống như Run, Task Manager, Control Panel, khởi động lại máy,…
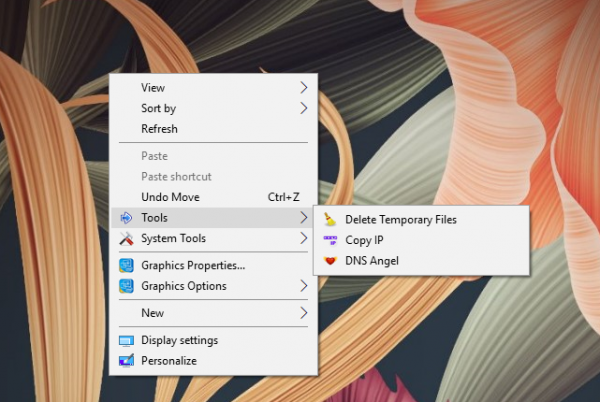
Muốn sử dụng tiện ích nào thì bạn bấm chọn lên. ECM sẽ tích hợp biểu tượng chức năng vào trình đơn chuột phải dưới biểu tượng (Enable Icon) hay ẩn chỉ xuất hiện khi thêm phím Shift (Enable Shift – Click). Bạn bấm chuột phải lên tiện ích để chọn cách hiển thị hay vị trí cho chúng. Sau cùng, bấm Apply Changes (Ctrl + S) để lưu lại thiết lập và bạn có thể kiểm tra ngay sau đó.
2. Cách thêm tiện ích khác:
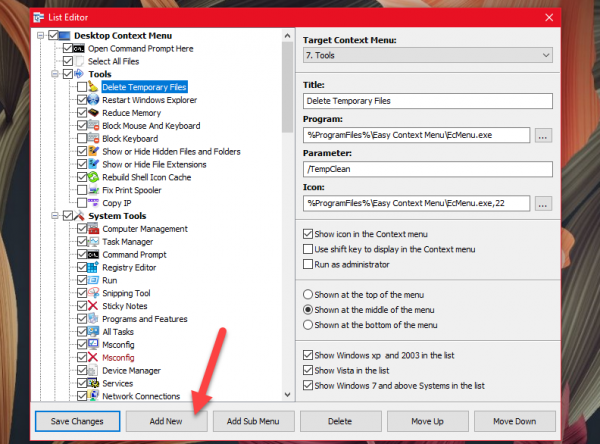
Bên cạnh những tiện ích, chương trình có sẵn bạn có thể thêm ứng dụng khác mà mình muốn tạo lối tắt cho nó để khởi động nhanh từ trình đơn chuột phải. Bấm File > List Editor hay Ctrl + E. Trong cửa sổ mở ra, bạn chọn mục đặt lối tắt của tiện ích.
Thí dụ, người viết muốn đặt lối tắt VLC trong System Tools của Desktop Context Menu thì bấm vào Sytem Tools của Desktop Context Menu.
Tiếp theo, bạn bấm Add new > chọn file thực thi exe của VLC. Sau đó, bạn có thể đặt lại tên hiển thị cho lối tắt của VLC (Title), cách kích hoạt, vị trí,… ở bên phải cửa sổ.
Nếu muốn thay đổi vị trí của lối tắt tiện ích, bạn bấm Move Up để di chuyển lên trên hay xuống dưới với Move Down. Sau cùng, bấm Save Changes.
3. Dọn dẹp các tùy chọn menu ngữ cảnh không cần thiết:
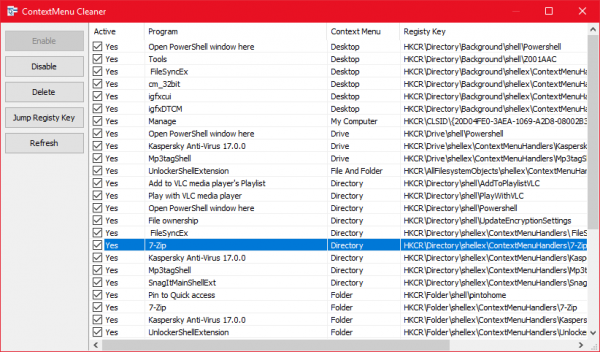
Khi cài đặt một phần mềm vào Windows, nó thường tích hợp thêm các tùy chọn vào menu ngữ cảnh. Thay vì vào từng ứng dụng để tắt, bạn có thể thực hiện ngay từ ECM với tất cả ứng dụng.
ADVERTISEMENT
Bấm File > Context Menu Cleaner hay Ctrl + X. Bạn sẽ nhìn thấy tất cả các tùy chọn có trên menu ngữ cảnh. Để vô hiệu hóa, bạn bỏ dấu chọn tại tùy chọn tương ứng hay bấm Disable. Nếu muốn xóa luôn thì bấm Delete.