Trao đổi với tôi

http://www.buidao.com

12/30/20

[Download mp3] Convert YouTube to MP3 - Download MP3 from Youtube for free

Convert YouTube to MP3 - Download MP3 from Youtube for free


https://x2convert.com/en17/download-youtube-to-mp3-music

8/21/20

[Convert] Hướng dẫn tạo một file PDF từ nhiều file ảnh trên Windows

Link bài viết: https://quantrimang.com/huong-dan-tao-mot-file-pdf-tu-nhieu-file-anh-tren-windows-121367 

PDFs được thiết kế hỗ trợ văn bản thô cùng với font chữ, hình ảnh, âm thanh và nhiều hiệu ứng khác. Nếu bạn có một bộ sưu tập ảnh, tài liệu văn bản mà bạn muốn quét vào máy tính ở định dạng JPEGs, bạn có thể kết hợp các file này thành một file PDF để dễ dàng chia sẻ cho bạn bè, người thân.

Trên Windows 10 đã tích hợp thêm tùy chọn để in file PDF gốc trên File Explorer. Bạn có thể dễ dàng lựa chọn hàng chục file ảnh và in các file này trực tiếp thành 1 file PDF trên File Explorer.

Nếu bạn sử dụng Windows 7 hoặc 8, quá trình chèn file ảnh vào file PDF cũng thực hiện tương tự như trên Windows 10. Tuy nhiên bạn phải cài đặt và nhờ đến sự hỗ trợ của ứng dụng thứ 3.
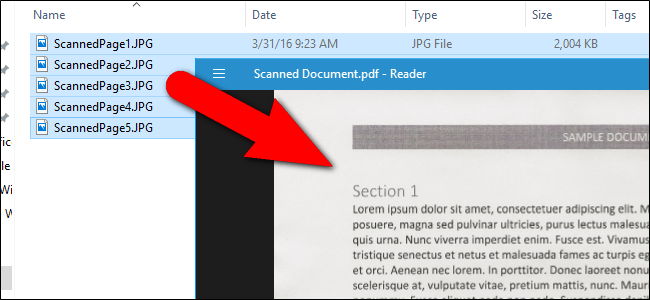
file PDF

1. Làm thế nào để in một file PDF trên Windows 10

Để chèn nhiều ảnh vào file PDF trên Windows 10, đầu tiên bạn cần đảm bảo rằng các file ảnh bạn muốn thêm vào file PDF được liệt kê trên File Explorer. Bạn có thể đổi tên các file này thành tên ngắn gọn nếu muốn.

Sau khi đã đổi tên file ảnh xong, bạn chọn tất cả các file mà bạn muốn chèn vào file PDF sau đó kích chuột phải rồi chọn Print.
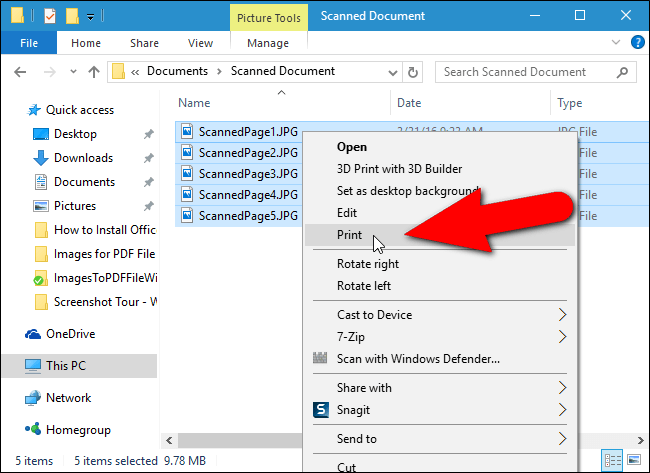
Print

Lúc này trên màn hình xuất hiện hộp thoại Print Pictures. Tại đây, trên menu Dropdown mục Printer bạn chọn Microsoft Print to PDF.
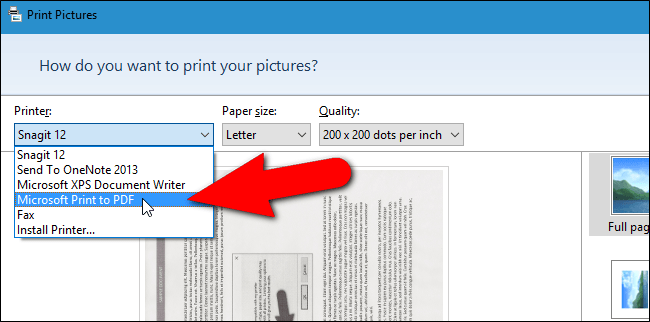
Microsoft Print to PDF.

Nếu không nhìn thấy tùy chọn này trên danh sách, bạn phải tiến hành kích hoạt tùy chọn. Các bước kích hoạt tùy chọn Quản trị mạng sẽ hướng dẫn ở mục dưới.

Tiếp theo sử dụng mũi tên phải, trái để cuộn xuống tìm ảnh mà bạn muốn thêm vào file PDF.

Click chọn liên kết Options ở góc dưới bên phải hộp thoại để truy cập thêm tùy chọn file PDF.
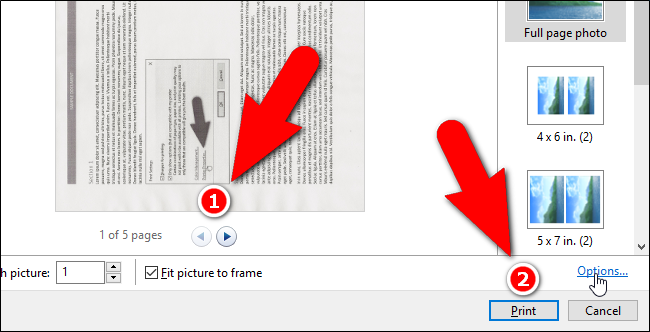
liên kết Options

Trên hộp thoại Print Settings, bạn đánh tích chọn 2 tùy chọn Sharpen for printing nếu muốn sharpen hình ảnh trước khi in và tùy chọn Only show options that are compatible with my printer nếu muốn in trên máy in cá nhân của bạn.

Click chọn liên kết Printer Properties để truy cập thuộc tính máy tin.
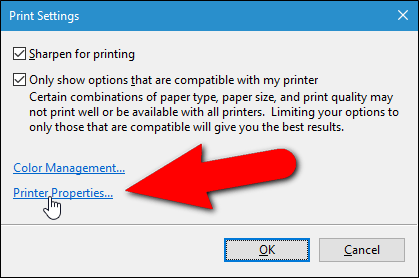
Printer Properties

Tiếp theo trên cửa sổ hộp thoại Microsoft Print to PDF Document Properties bạn có thể lựa chọn tài liệu mà bạn muốn - Landscape hoặc Portrait từ menu Dropdown mục Orientation.
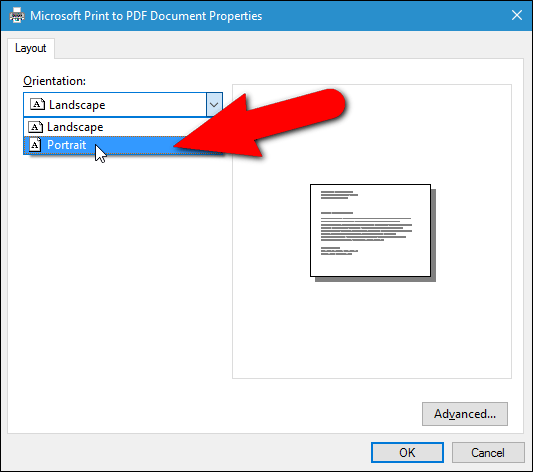
Landscape hoặc Portrait

Click chọn OK để chấp nhận thay đổi.

Click chọn OK

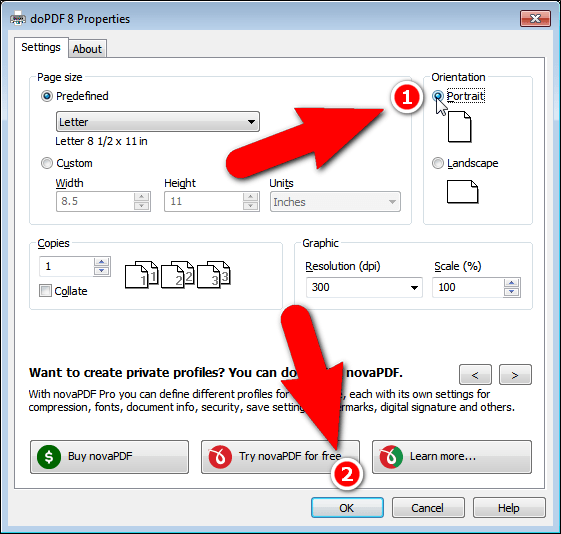
Lưu ý: Nếu bạn sử dụng Windows 7, khi click chọn liên kết Printer Properties sẽ mở ra hộp thoại doPDF Properties. Hộp thoại này cũng cho phép bạn thay đổi trang Orientation (và một số thiết lập khác). Cuối cùng click chọn OK để lưu lại thay đổi.

Lúc này bạn sẽ quay lại hộp thoại Print Pictures. Nếu để ý, hình ảnh khi bạn chèn vào đã bị cắt đi một chút. Click vào hộp check box Fit picture to frame để bỏ tích đi. Lúc này bạn sẽ nhìn thấy toàn bộ hình ảnh.
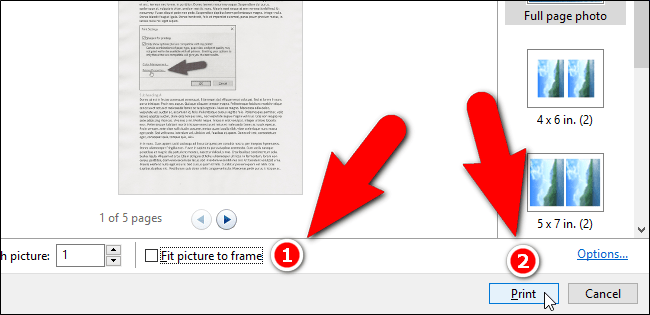
Fit picture to frame

Ngoài ra bạn có thể kích hoạt hoặc vô hiệu hóa tùy chọn Fit picture to frame trên tất cả hình ảnh bạn thêm vào file PDF.

Tiếp theo click chọn Print để tạo file PDF của bạn.

Trên hộp thoại Save Print Output As, điều hướng đến vị trí bạn muốn lưu file PDF. Bạn có thể chọn lưu tại vị trí mà bạn lưu file ảnh hoặc bất kỳ vị trí nào khác.

Nhập tên file PDF trong khung File name rồi click chọn Save.

chọn Save

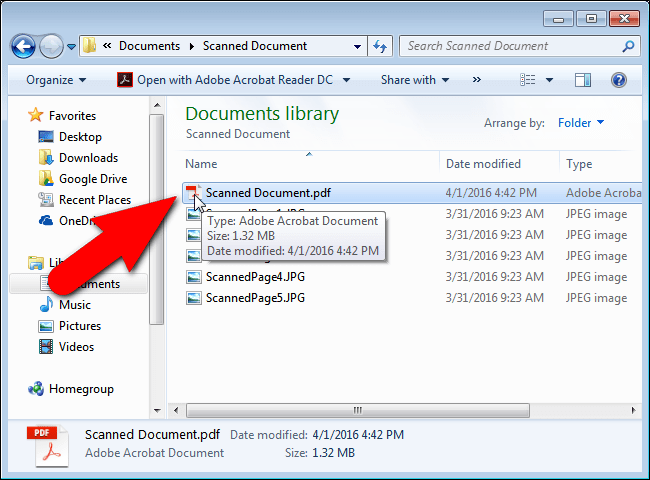
Sau khi hoàn tất, file PDF của bạn đã được tạo ra. Bạn có thể mở file PDF bằng PDF viewer mặc định trên Windows hoặc bất kỳ PDF reader nào mà bạn đã cài đặt trên máy.
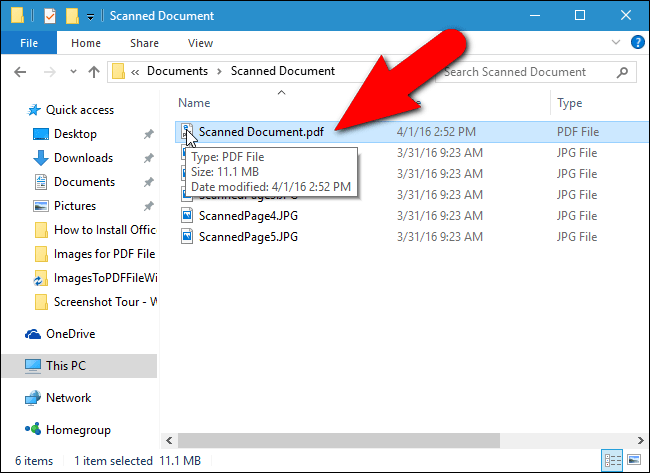
hoàn tất file PDF

2. Hướng dẫn kích hoạt tùy chọn Microsoft Print to PDF trên Windows 10

Nếu tùy chọn Microsoft Print to PDF không có sẵn trong Menu Dropdown mục Printer trên hộp thoại Print Pictures, bạn sẽ phải tiến hành thêm tùy chọn này.

Để cài đặt driver Microsoft Print to printer, đầu tiên bạn mở hộp thoại Print Pictures sau đó chọn trong Menu Dropdown mục Printer bạn chọn Install Printer.
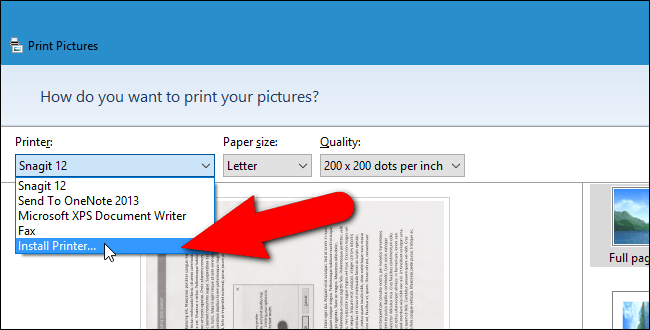
Install Printer.

Cửa sổ hộp thoại Add a device xuất hiện và bắt đầu tìm kiếm thiết bị. Bạn không cần phải chờ cho đến khi quá trình tìm kiếm kết thúc. Click vào liên kết The printer that I want isn't listed ở gần phía dưới hộp thoại.
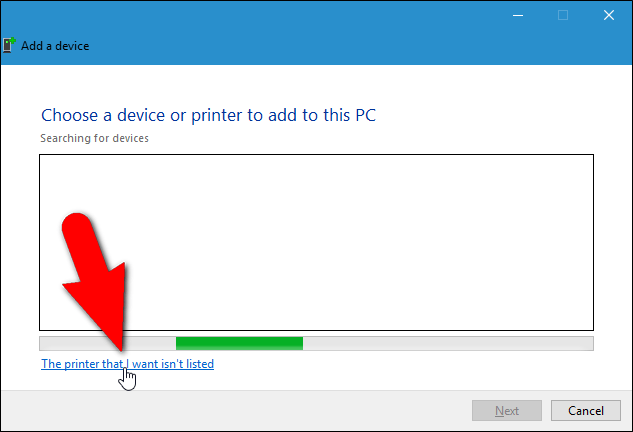
The printer that I want isn't listed

Trên cửa sổ hộp thoại Add Printer, click chọn Add a local printer or network printer with manual settings, sau đó click chọn Next.
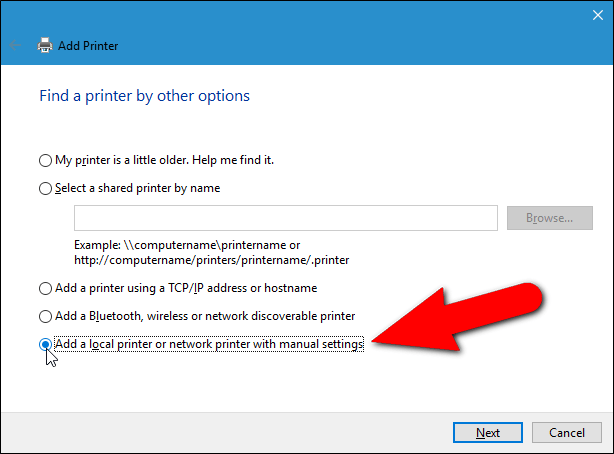
Add a local printer or network printer with manual settings

Lưu ý:

Ngoài ra bạn có thể truy cập hộp thoại bằng cách mở PC Settings sau đó click chọn Devices => Printers & Scanners => Add a printer or scanner.

Tiếp theo click chọn liên kết The printer that I want isn't listed để Windows cố gắng tìm kiếm các thiết bị.

Sau đó chọn tiếp tùy chọn Use an existing port. Chọn FILE: (Print to file) trên Menu ở khung bên phải rồi click chọn Next.
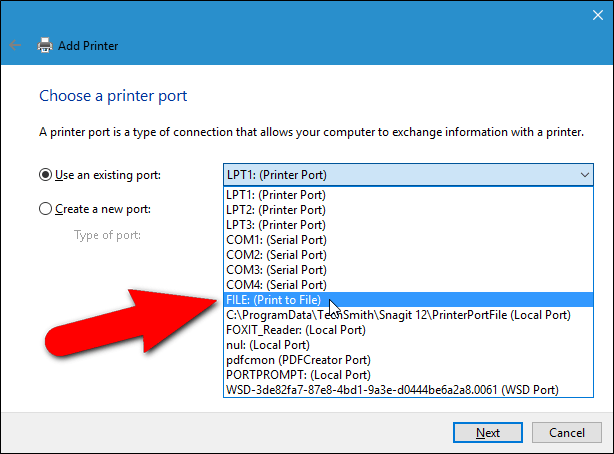
FILE: (Print to file)

Để chọn driver PDF printer, trên danh sách tùy chọn ở khung bên trái bạn chọn Microsoft, sau đó chọn Microsoft Print to PDF ở danh sách khung bên phải rồi click chọn Next.

Microsoft

Trường hợp khác có thể là bạn đã cài đặt driver máy in. Trong trường hợp này trên cửa sổ hộp thoại Add Printer sẽ yêu cầu bạn chọn phiên bản dirver mà bạn muốn sử dụng.

Lưu ý: Chọn tùy chọn Use the driver that is currently installed sau đó click chọn Next.
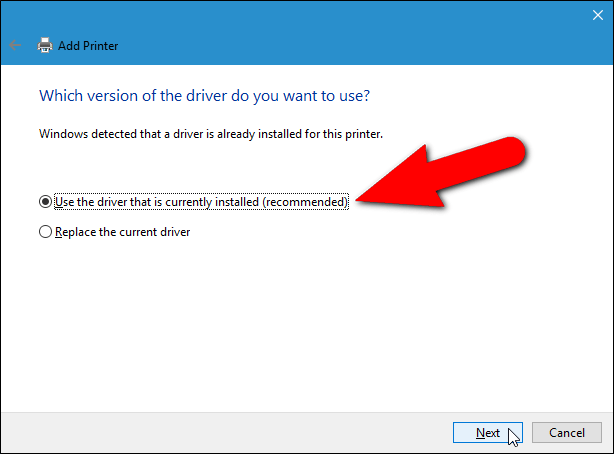
Use the driver that is currently installed

Theo mặc định, driver máy in được đặt tên là Microsoft Print To PDF. Tên này được hiển thị trên menu Dropdown mục Printer trên hộp thoại Print Pictures hoặc bất kỳ vị trí khác trên Windows....

Tuy nhiên bạn có thể thay đổi tên driver này bằng cách nhập một tên mới trong khung Printer name rồi click chọn Next.
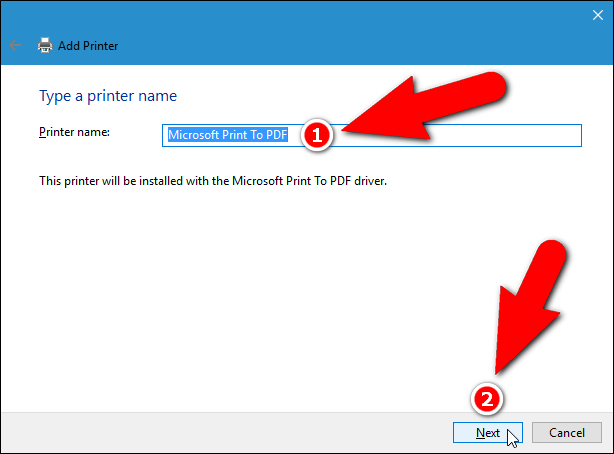
Printer name

Lúc này bạn sẽ nhận được thông báo cài đặt driver máy in thành công. Nếu muốn in file PDF, bạn có thể thiết lập tùy chọn in file PDF làm tùy chọn mặc định bằng cách đánh tích vào tùy chọn Set as the default printer, sau đó click chọn Finish.
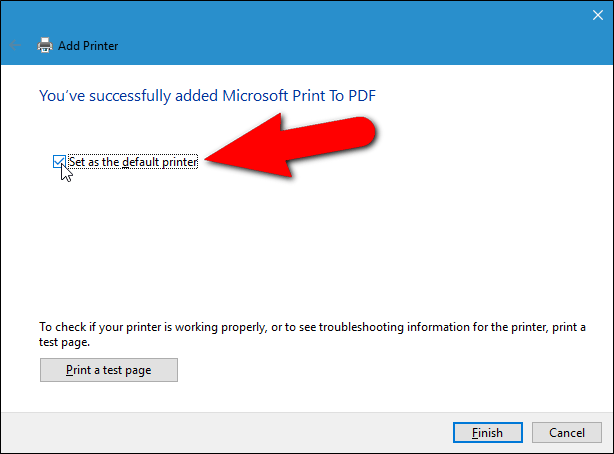
Set as the default printer

Quay trở lại hộp thoại Print Pictures nơi bạn cài đặt diver Microsoft Print To PDF printer. Bây giờ bạn có thể tiếp tục thực hiện các bước để tạo file PDF từ hình ảnh đã chọn.
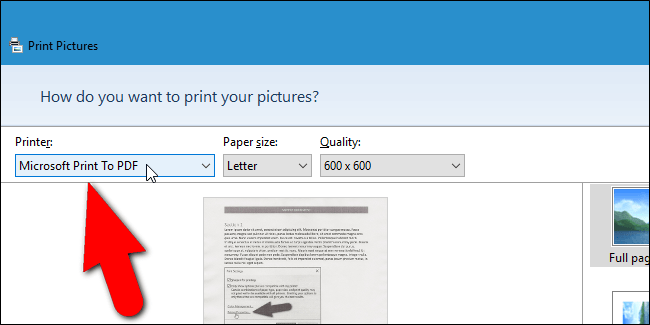
hộp thoại Print Pictures

3. Làm thế nào để in file PDF trên Windows 7 và Windows 8

Quá trình tạo file PDF từ các file ảnh trên Windows 7 và Windows 8 cũng tương tự như trên Windows 10, ngoại trừ 1 bước. Khi bạn kích chuột phải vào file ảnh, chọn Print để truy cập hộp thoại Print Pictures bạn sẽ thấy tùy chọn Microsoft Print To PDF xuất hiện trong menu Dropdown Printer.
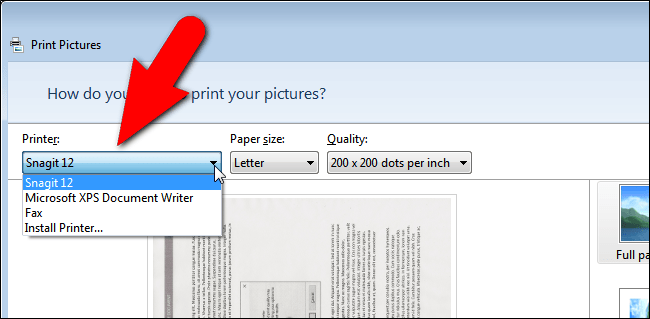
hộp thoại Print Pictures

Có rất nhiều công cụ PDF có sẵn mà bạn có thể sử để thêm driver PDF printer.

Dưới đây Quản trị mạng sẽ hướng dẫn bạn cách cài đặt và sử dụng công cụ doPDF để tạo file PDF từ nhiều file ảnh khác nhau.

Đầu tiên tải doPDF về máy và cài đặt.

Tải doPDF về máy và cài đặt tại đây.

Tiếp theo mở hộp thoại Print Pictures bạn sẽ thấy tùy chọn doPDF 8 xuất hiện trong danh sách menu Dropdown mục Printer. Nhiệm vụ của bạn là chọn tùy chọn này.
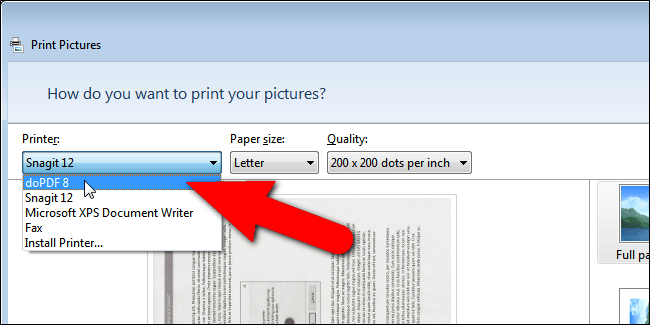
doPDF 8

Thực hiện các bước tương tự như trên phần hướng dẫn Windows 10 ở trên cho đến bước click chọn Print để tạo file PDF.

Sau khi đã thực hiện xong, chọn doPDF 8 từ menu Dropdown mục Printer. Lúc này trên màn hình sẽ hiển thị hộp thoại doPDF 8 – Save PDF.

Tên file và vị trí file mặc định hiển thị trong phần File name. Bạn có thể thay đổi file bằng cách click chọn Browse.

Browse

Lúc này hộp thoại Browse xuất hiện, điều hướng đến vị trí nơi bạn muốn lưu file PDF. Theo mặc định vị trí lưu file PDF là vị trí nơi bạn lưu trữ file ảnh, tuy nhiên bạn có thể thay đổi lưu ở một vị trí khác.

Nhập tên file PDF vào khung File name sau đó click chọn Save.
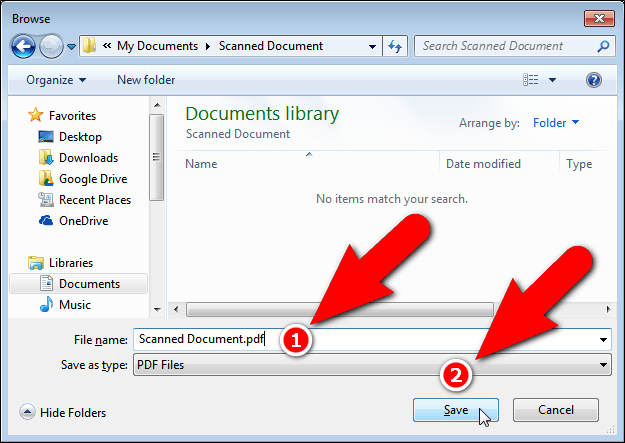
chọn Save

Quay trở lại hộp thoại doPDF 8 – Save PDF file. Tại đây bạn có thể lựa chọn chất lượng và kích thước file PDF và nhúng font chữ ở dưới tùy chọn PDF.

Ngoài ra nếu muốn sử dụng thư mục mà bạn vừa chọn để làm thư mục lưu file PDF tự động cho những lần sau, click chọn Always use this folder.

Để mở file PDF bằng chương trình PDF reader mặc định trên máy tính, chọn Open PDF in reader. Sau đó click chọn OK để bắt đầu tạo file PDF.
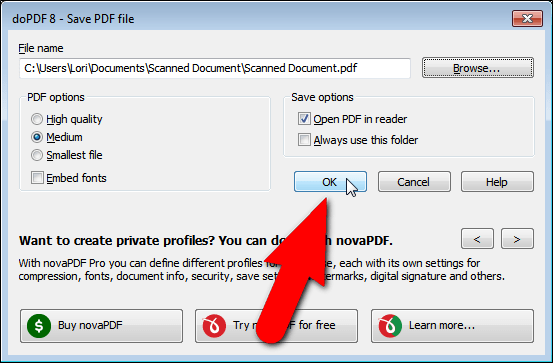
chọn OK

File PDF được tạo và được thêm vào thư mục bạn chỉ định. Bạn có thể mở file PDF bằng PDF reader mặc định.
file PDF

5/23/20

[Word] Phần mềm chuyển ảnh sang Word chuẩn nhất

Bạn có file ảnh và muốn chuyển sang dạng Word để thuận tiện cho việc chỉnh sửa dữ liệu nhưng lại chưa biết cách thực hiện.
phan mem chuyen anh sang word chuan nhat
Cách 1: Sử dụng phần mềm ABBYY Fine Reader
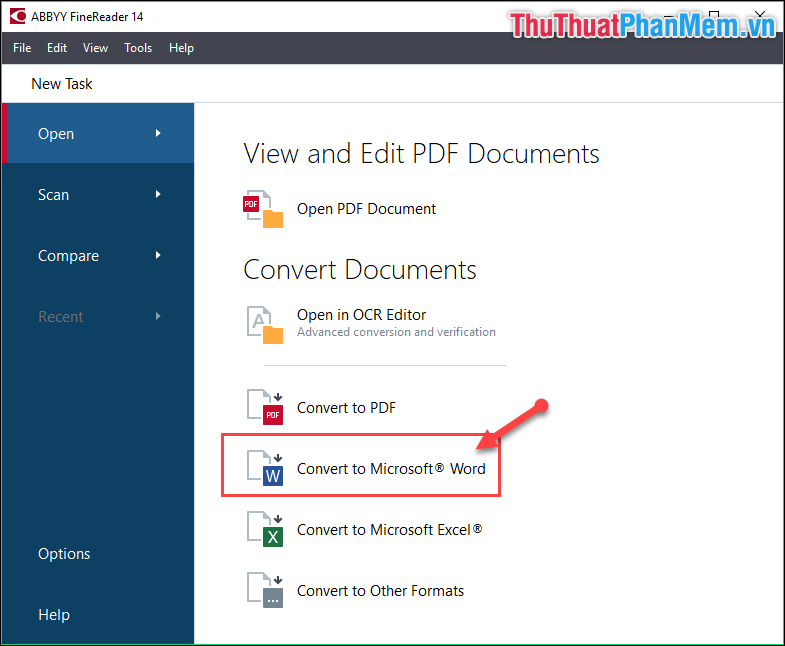
Bước 1: Bạn mở phần mềm ABBYY Fine Reader lên, sau đó chọn mục Convert to Microsoft Word.
phan mem chuyen anh sang word chuan nhat
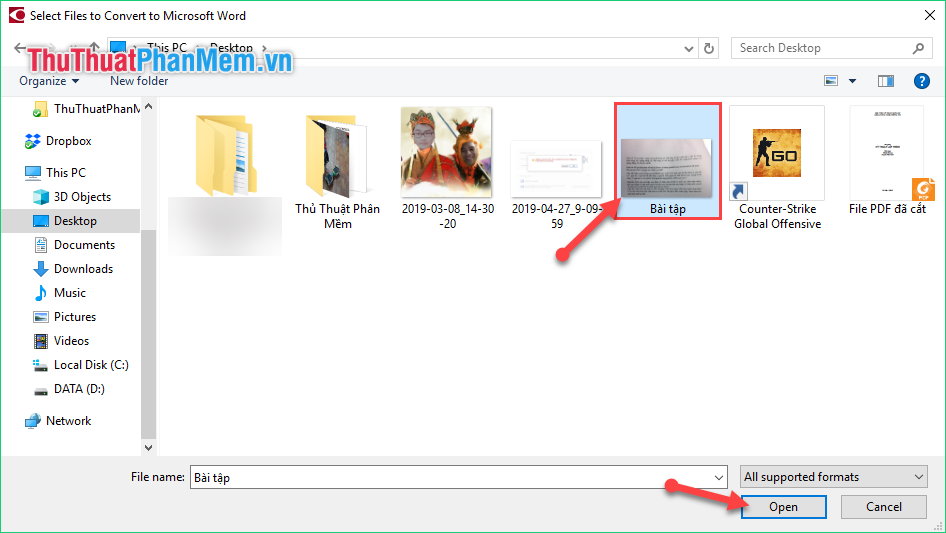
Bước 2: Lựa chọn ảnh mà bạn muốn chuyển sang Word -> sau đó ấn Open.
phan mem chuyen anh sang word chuan nhat
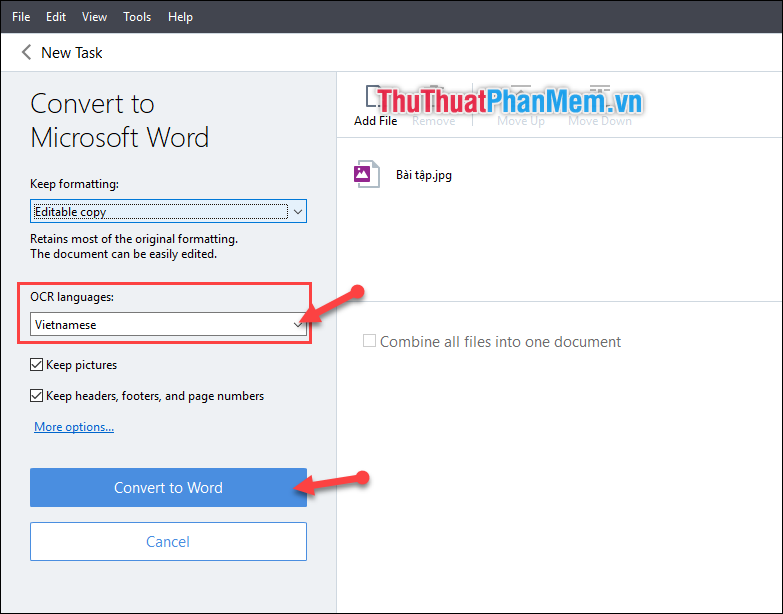
Bước 3: Tại mục OCR Languages bạn chọn Vietnamese -> Sau đó ấn vào Convert to Word.
phan mem chuyen anh sang word chuan nhat
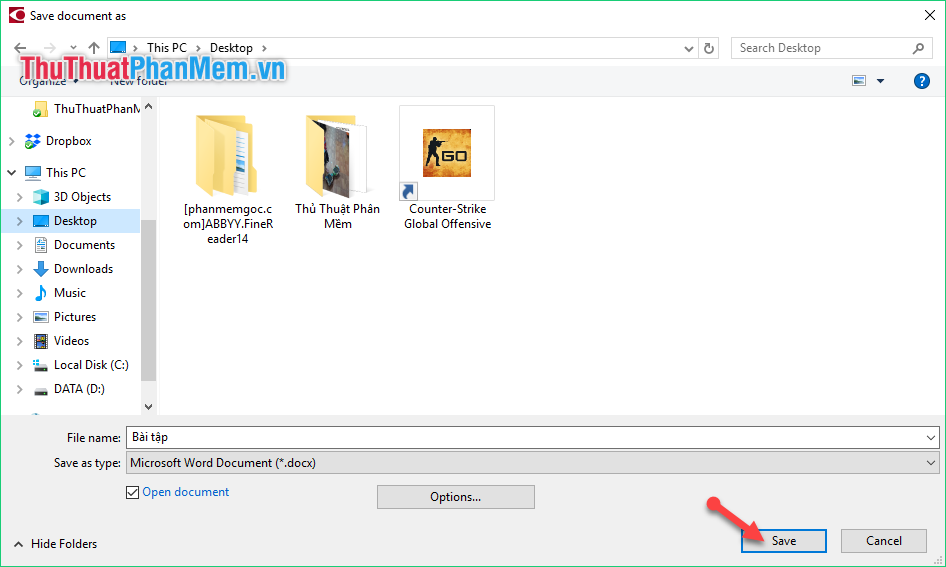
Bước 4: Lựa chọn thư mục chứa file Word sau khi chuyển đổi -> Chọn Save.
phan mem chuyen anh sang word chuan nhat
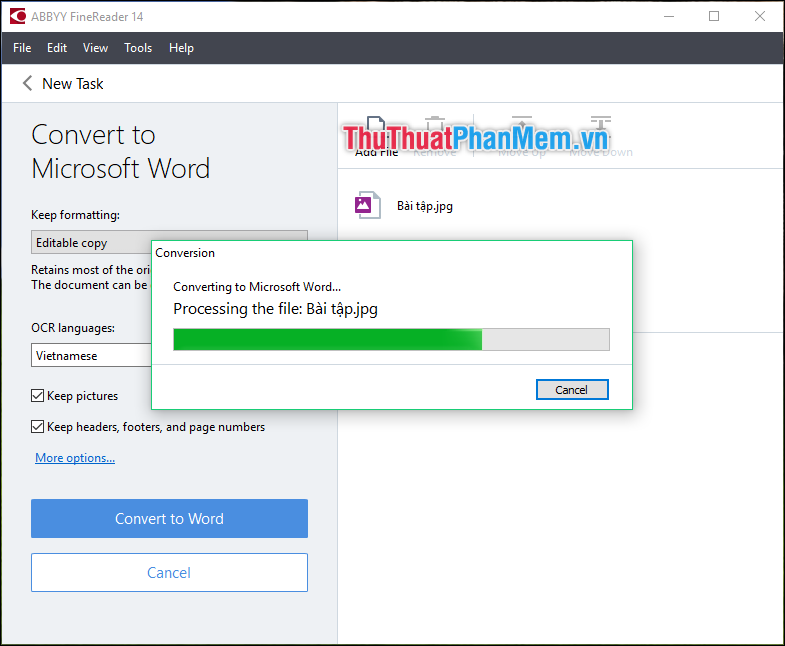
Bước 5: Sau đó phần mềm sẽ thực hiện việc chuyển đổi từ file ảnh sang Word.
phan mem chuyen anh sang word chuan nhat
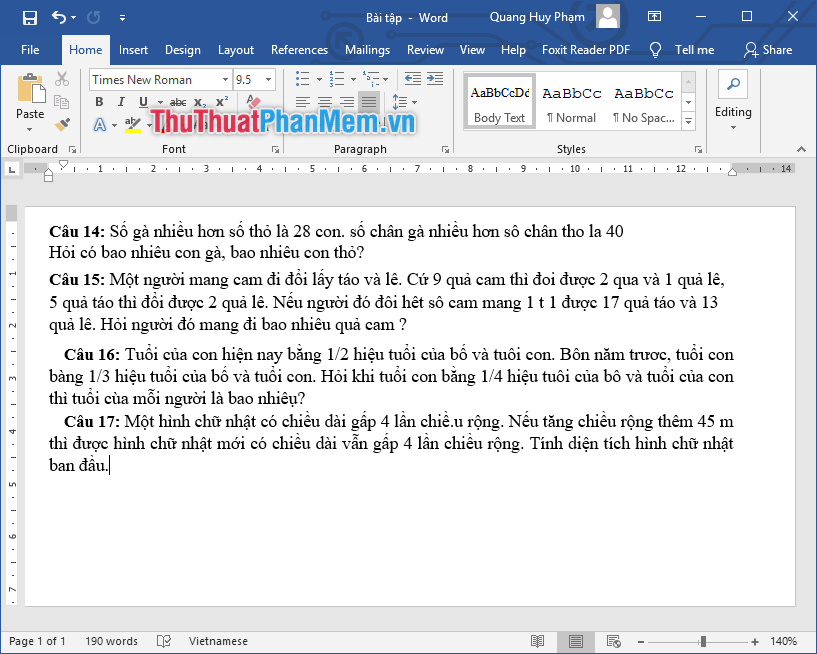
Và kết quả chúng ta thu được:
phan mem chuyen anh sang word chuan nhat
Cách 2: Sử dụng website Free Online OCR
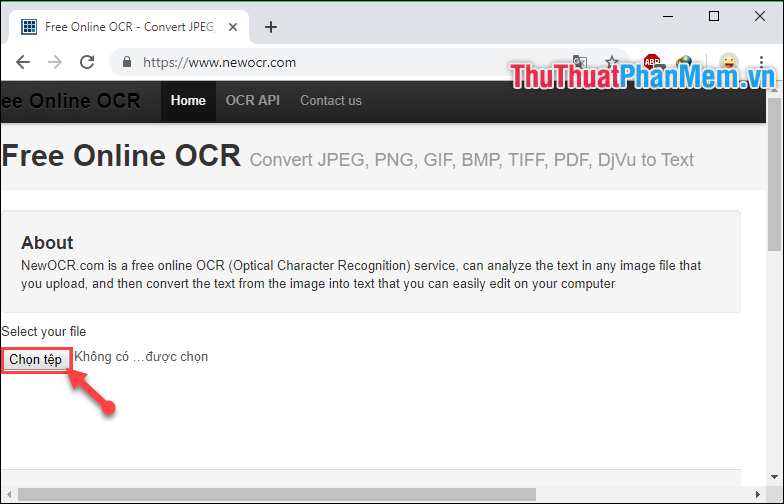
Bước 1: Các bạn truy cập địa chỉ website: https://www.newocr.com/
Bước 2: Sau đó ấn vào Chọn tệp.
phan mem chuyen anh sang word chuan nhat
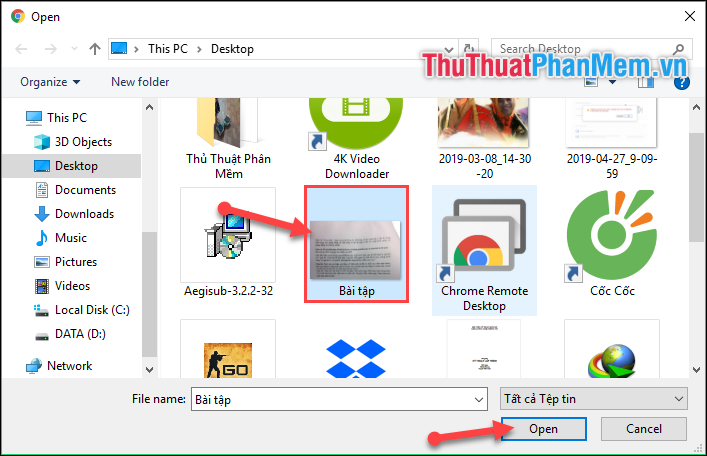
Bước 3: Sau đó tìm đến file ảnh mà bạn muốn chuyển đổi sang Word. Rồi chọn Open.
phan mem chuyen anh sang word chuan nhat
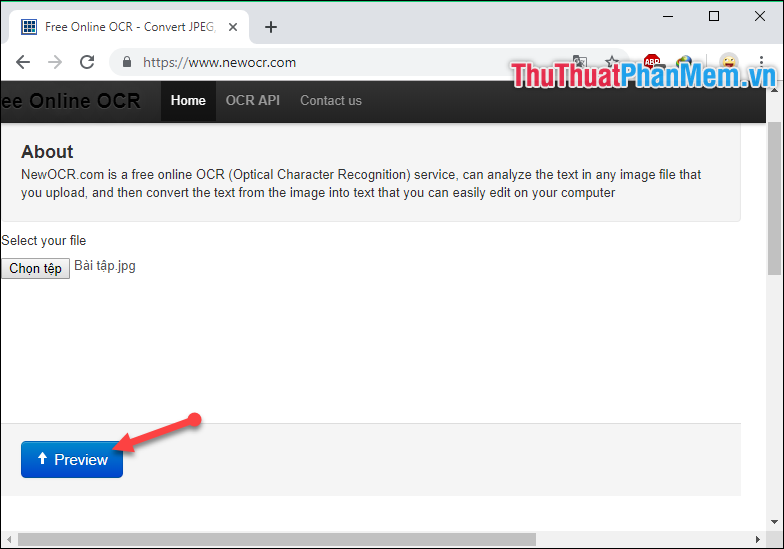
Bước 4: Sau đó trở lại giao diện ban đầu của Website, bạn chọn Preview.
phan mem chuyen anh sang word chuan nhat
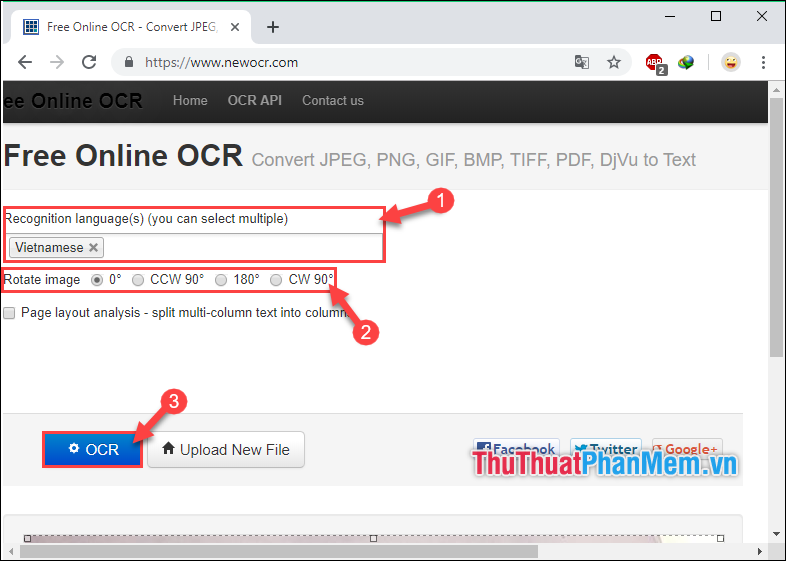
Bước 5: Tại giao diện mới:
(1) Bạn lựa chọn Vietnamese tại mục Recognition language.
(2) Nếu ảnh của bạn bị ngược hoặc ko đúng chiều bạn có thể xoay ảnh tại đây.
(3) Sau khi hoàn tất bạn chọn OCR để tiếp tục.
phan mem chuyen anh sang word chuan nhat
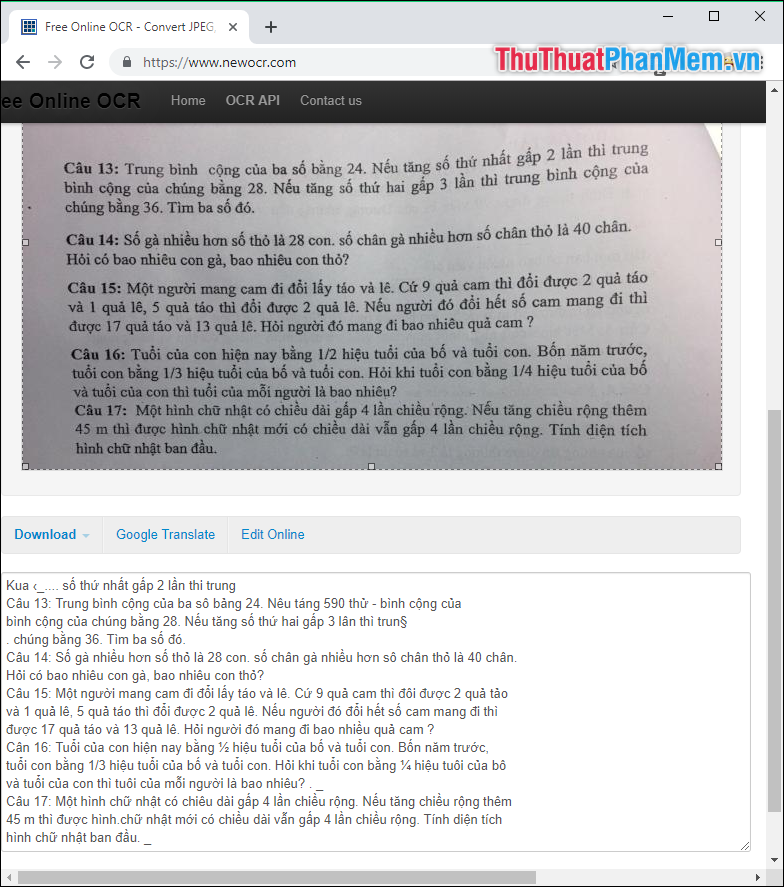
Bước 6: Ngay sau đó bạn sẽ thấy bản Word của file ảnh sẽ được hiển thị ngay dưới hình ảnh. Lúc này bạn chỉ cần Copy tất cả chỗ đó và Paste vào Word như bình thường thôi.
phan mem chuyen anh sang word chuan nhat
Lưu ý: Có thể do một số vấn đề như hình ảnh không rõ nét hoặc chữ quá gần nhau khiến website nhận diện nhầm. Cho nên các bạn nên đọc rà soát lại một lượt bản Word để tránh xảy ra sai sót trong công việc.
Cách 3: Sử dụng trang web trực tuyến Convertio.co
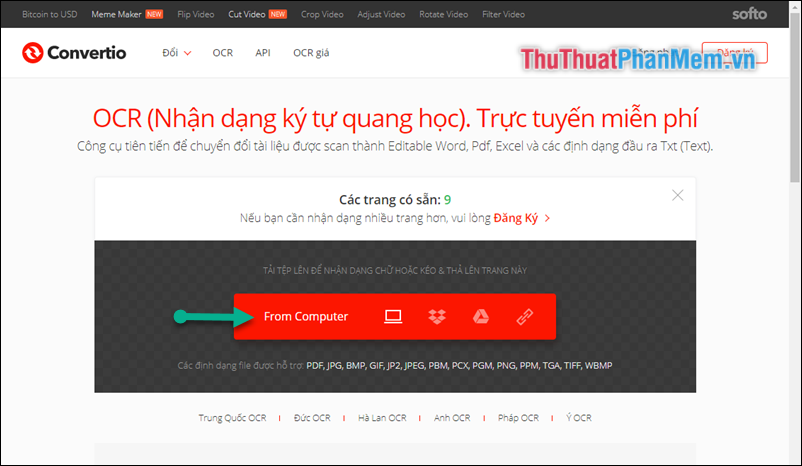
Bước 1: Các bạn truy cập địa chỉ: https://convertio.co/vn/ocr/
Bước 2: Sau đó tại giao diện của trang web, bạn chọn
phan mem chuyen anh sang word chuan nhat
để tải ảnh của bạn từ máy tính.
Ngoài ra các bạn cũng có thể up ảnh từ Dropbox, Google Drive hoặc link URL.
phan mem chuyen anh sang word chuan nhat
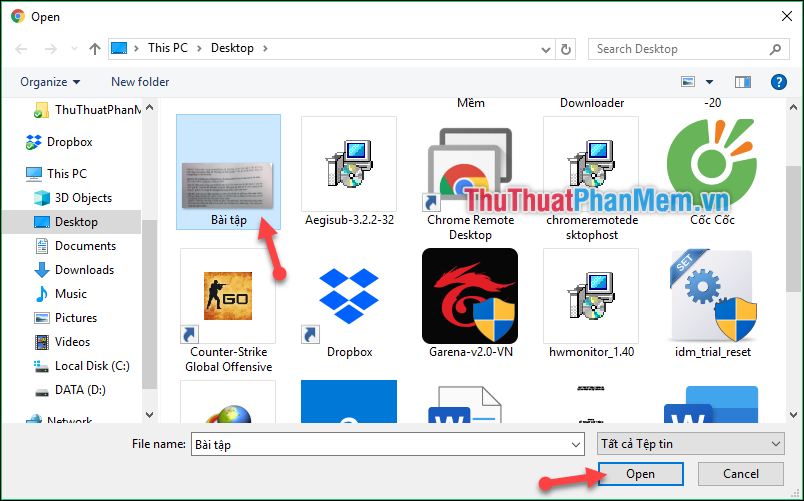
Bước 3: Lựa chọn ảnh mà bạn đã chuẩn bị từ trước. Sau đó chọn Open.
phan mem chuyen anh sang word chuan nhat
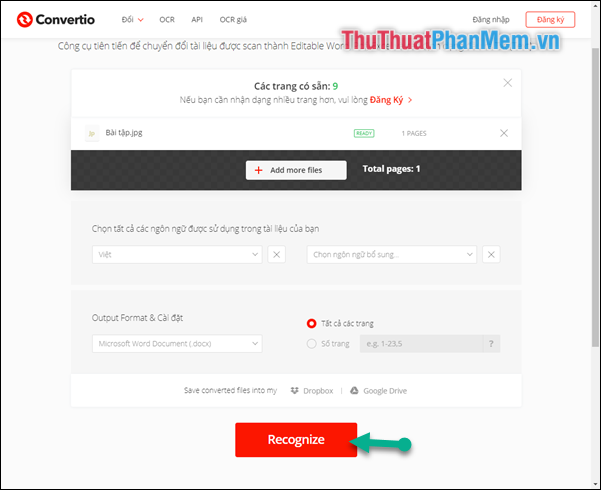
Bước 4: Sau đó kéo xuống dưới chọn Recognize.
phan mem chuyen anh sang word chuan nhat
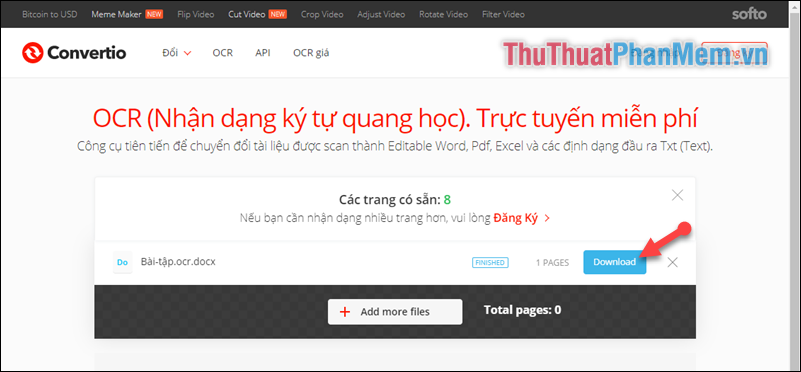
Bước 5: Sau đó ấn vào Download để tải xuống file Word sau khi chuyển đổi.
phan mem chuyen anh sang word chuan nhat
Rất dễ dàng, nhanh chóng và đơn giản đúng không các bạn. Hy vọng qua bài viết này các bạn có thể dễ dàng thực hiện việc chuyển đổi từ ảnh sang Word để thuận tiện cho công việc của mình. Cảm ơn các bạn đã theo dõi bài viết. Chúc các bạn thực hiện thành công!

ABBYY Finereader 12 Portable


4/25/20

[Repair Disk] How to fix drive is not accessible in Windows 10/8/7

Summary

Readily fix the 'drive is not accessible' error on the drive C, D, E, F or other partitions in Windows 10/8.1/8/7 without losing data. The error messages followed by the 'drive is not accessible' prompt vary, but the solutions are all covered here. You do not fear a single data loss because EaseUS Data Recovery Wizard is able to recover data for you from an inaccessible HDD, USB flash drive or memory card without a hitch.
Sometimes, hard drives, external hard disks,  and USB flash drives are prone to infect viruses or suffer from a power failure. In this case, the "drive is not accessible" error might occur unexpectedly and make Windows prevent you from accessing the files and folders on the disk. For the general troubleshooting of a drive partition that lost the access at present, a quick format can usually get it on the right track. However, all present data on the selected drive will be erased completely.
drive is not accessible on drive f
Since you cannot open the drive at the moment, neither can you back up the data before formatting it. So the best idea is to temporarily forget this method, try the other secure ways as an attempt.
For some people who have formatted the hard drive and lost data already, to avoid data overwriting by further operations, the prior thing is to download EaseUS hard drive recovery software to recover formatted partition data.

Common Error Messages

When you get stuck in with this issue problem, you will usually get a 'Location is not available' as a head error, and followed by are complementary messages, as mentioned in the following examples. In all situations, Windows tells you that you cannot access this drive at the moment. And in different situations, you can get different error messages in details. Here are some common ones followed by the "Drive is not accessible":
All the error messages imply the different causes of this "drive is not accessible" error. So, to effectively troubleshoot the problem, you should take the right measures in different situations.

Effective Solutions

Among all the given instances, the 'drive is not accessible, access is denied' are one of the commonest errors. So next, we'll focus on a step-by-step guide for how to fix the 'drive is not accessible access is denied' error in Windows 10. The solution also works for other Windows platforms.

Fix the 'Drive is not accessible. Access is denied' error

Usually, when your external hard drive shows the "Drive is not accessible. Access is denied" error message, it is because you don't have the privilege of accessing your disk. So, to fix the issue, you have to take ownership to get permission in Windows Explorer. To do it:
Right-click on the inaccessible hard drive, select Properties. Go to the Security tab, hit Advanced, then click the Edit button. On the Owner tab, modify the ownership of the specified account.
Fix 'Drive is not accessible. Access is denied' error in Windows Explorer
Here I made a GIF image to illustrate how to grant authenticated users to read/write and get full control of the computer hard drive. 
We suggest you try to add one more user name besides authenticated users to the Owner. "Everyone" generally solves the trouble of not being able to access a hard drive due to limited privilege, but it increases the risk of exposing your computer to every person who have your computer password. 
A step-by-step guide to fix 'drive is not accessible' error:
step-by-step guide to fix drive is not accessible error

Fix the 'Drive is not accessible' issue with other error messages

If the "drive is not accessible" issue comes with other error messages, it might suggest that the causes are file system corruption, disk errors, corruptions or bad sectors. In this case, you can run CHKDSK to fix the problem. To do it:
Step 1: Plug in your external hard drive, USB drive or memory card to your PC.
Step 2:  Open a Command Prompt.
  • In Windows 7, Click Start, type in "cmd" in a search box, hit Enter and then click "cmd.exe" under the list of programs.
  • In Windows 10/8, press the Windows Key + X buttons and select the Command Prompt (Admin) option.
Step 3: In the new Command Prompt window, type chkdsk E: /f /r. (Here E is the drive letter of the disk which shows the "drive is not accessible" error.)
If you don't have any technical know-how and want to minimize data risks, using third-party software could be a better choice. The Command line is suitable for computer professionals since wrong commands can cause severe problems. Therefore, we strongly recommend you try an automatic command line alternative.
EaseUS Tools M is a practical computer fixing tool that is safe and light-weighted. It's a perfect alternative to CHKDSK command. Use this one-click tool to solve your computer issues.
To fix file system error or disk error:
Step 1:  DOWNLOAD EaseUS Tools M for Free and install it.
Step 2: Open the software and select the "File Fixing" option. 
On the right pane, choose the drive and check off the box at the bottom - "Check and fix file system error". Then, click "Fix" to start repairing the error.
Step 3: Wait until the operation completes. Wait until the operation completes. After the operation completes, click the "View" button to check the drive. 
select the drive and check off file system error

Recover data and format to fix drive is not accessible error

If you still experience the "drive is not accessible" error after trying the above methods, we recommend you to try EaseUS Data Recovery Wizard. It's a renowned hard drive data recovery program that retrieves your data from an inaccessible storage drive. It's always suggested that data recovery goes first than disk formatting, to ensure the highest chance of successful & complete data recovery.
Step 1. Select and scan hard drive.
On EaseUS Data Recovery Wizard, select the drive where you lose your data and click "Scan". Wait patiently until this program finishes the scanning, it will find all your lost data on the drive.
select and scan the hard drive
Step 2. Find and preview found files on the selected drive.
Check "Deleted Files", "Lost Files" or use "Filter", "Search" to find the lost files on the selected hard drive. You can double-click to open and check the found files.
Preview lost hard drive data
Step 3. Recover and save lost hard drive data.
Select all found lost hard drive files, click "Recover" and browse another secure location to save them. Click "OK" to confirm and finish the recovery process.
recover data from hard drive
After the data recovery, you can try to format your hard drive to fix the "drive is not accessible" error. To do it, go to My Computer or This PC, right-click the disk you need to repair and then choose Format. In the pop-up window, you can set the file system and cluster size and then click the OK button.

format a not accessible hard drive