Trao đổi với tôi

http://www.buidao.com

11/7/22

[System Info] How to Block a Program with Windows Firewall in Windows 10

 Sometimes you may want to prevent an application from accessing the Internet. This tutorial gives a step-by-step guide to teach you how to block a program with Windows firewall in Windows 10.

Normally you would want your applications to have free access to the network. However, no matter for what reason, you wish to block a program from accessing the Internet, you can check the step-by-step guide below to block program with Windows firewall in Windows 10.

How to Block a Program with Windows Firewall Windows 10

Step 1. Open Windows Firewall window

You can click Start, and type Windows Defender Firewall. Choose the top result to open Windows Defender Firewall.

You can also click Start, type control panel and choose the top result to open Windows Control Panel. Then click System & Security -> Windows Defender Firewall to open Windows Defender Firewall.

Step 2. Click Advanced settings

In the Windows Defender Firewall, you can click Advanced settings to enter into Windows Defender Firewall with Advanced Security app.

Windows Defender Firewall Advanced settings

Step 3. Enter into Firewall rule creation window

Next you can click Outbound Rules in the left column and it will display all existing outbound Windows firewall rules in middle window.

In the right Outbound Rules Actions column, you can click New Rule option to open a new window in which you can create a new Firewall rule by your own.

create a new Firewall rule

Step 4. Create a new Firewall rule

In the new window, you can choose “What type of rule would you like to create?”

You can click Program to get ready to rule controls connections for a program, and click Next.

click Program option

Step 5. Select the target program

You can tick This program path and click Browse to find path of the target program you want to block.

input the program path

You can click This PC in the left column, select the hard drive, and open the program’s folder and select the target program.

If you open the program in Firewall, Windows will restructure the path of the file. You can avoid this problem by manually coping and pasting the file path to the box.

Click the address bar to copy the path of the program, and paste it to the box. Please do contain the app’s name and extension at the end of the path.

Step 6. Name the Firewall rule

You can click Next button three times, and input a name for the new Firewall rule. Then click Finish button to create the new Firewall rule to block the program with Windows Firewall in Windows 10 and prevent the program from accessing the Internet.

Related: 3 Ways to Disable Windows Defender Antivirus on Windows 10

Download/Use Microsoft Phone Link App to Link Android and PC

Download and use Microsoft Phone Link (Your Phone) app for Windows 10/11 to link your Android phone and PC to access all Android content right from the PC.

READ MORE

How to Temporarily Disable a Program

Step 1. You can click Start and type Windows Defender Firewall. Choose Windows Defender Firewall to open it.

Step 2. Click Allow an app or feature through Windows Firewall in the left column. And click Change settings.

Step 3. Find the target program you want to block. If you can’t find the program in the list, you can click Allow another app…-> Browse, locate the program and open it, select the program name and click Add to add it to the list.

Step 4. Make sure the target program is not checked in the left. If a program is not checked, then it means Windows Firewall already blocks the program. Finally, click OK to save the changes and prevent the program from running on your Windows 10 computer.

temporarily disable a program in Windows Defender Firewall

Bottom Line

With the step-by-step guide above, hope you can easily block a program with Windows Firewall in Windows 10 now.


Link: https://www.minitool.com/news/block-program-with-windows-firewall-009.html

11/3/22

[Reverse] Reverse engineering Delphi executables

1/ IDR can be good for viewing class metadata and generating scripts that can (sometimes) improve IDA results, although they usually need to be manually edited to fix some bogus results.

https://github.com/crypto2011/IDR 

2/With IDA I've noticed sometimes it doesn't automatically detect a Delphi executable, so you can improve the analysis by:

- Open the executable but uncheck automatic analysis.
- Options -> Compiler to Delphi with calling convention Fastcall.
- Set the default string literals to Delphi or Delphi (16 bits), depending on how recent the executable is.
- View -> Open Subviews -> Type libraries, remove the defaults.
- View -> Open Subviews -> Signatures, remove the default and add the flirt signatures for your target (for example "bds" for Delphi 6/7), and mssdk32/64.
- Finally, start the analysis.

This can help quite a bit, although the flirt signatures tend to have a lot of false positives for VCL functions, so just be aware.

3/Check this out
https://github.com/Coldzer0/IDA-For-Delphi

4/Python 3.9 support for IDA 7.5

https://hex-rays.com/blog/python-3-9-support-for-ida-7-5/


10/28/22

[Reverse's Tools] Các tools dò tìm signate của một file exe

 Các tools dò tìm signature của một file exe

1/PeID;

  • PEiD detects most common packers, cryptors and compilers for PE files.
  • It can currently detect more than 470 different signatures in PE files.
  • It seems that the official website (www.peid.info) has been discontinued. Hence, the tool is no longer available from the official website but it still hosted on other sites.

donwnload: https://taimienphi.vn/download-peid-33068/0-95-phien-ban

download signature: https://raw.githubusercontent.com/ynadji/peid/master/userdb.txt

2/PE Detective:

Created by Erik Pistelli, a freeware PE identifier. This tool was originally designed to be part of the Explorer Suite II, but it can be downloaded separately as well. The PE Detective can scan single PE files or entire directories (also recursively) and generate complete reports. The PE Detective is deployed along with the Signature Explorer, which is an advanced signature manager to check collisions, handle, update and retrieve signatures.

donwnload: https://ntcore.com/?page_id=367

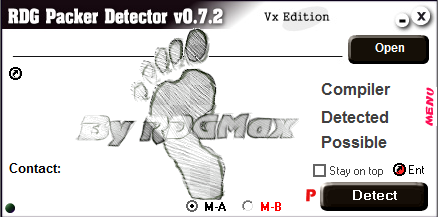
3/RDG Packer Detector 

All information, please read at homepage:
http://rdgsoft.net/

This site is closed, but version 0.7.2 is released , so i don’t have changelog or new infomation about this nice tool. However, this version was posted on tuts4you at Jan 1 2014, maybe some bug fixes and new signatures were added to improve the power :D.

Anyway, you can download this new version here ( i re-uploaded to Mediafire – no viruses detected so far):

DOWNLOAD LINK MEDIAFIRE

Enjoy reversing and best regard,

Levis/REPT

rdg packer detector 0.7.2 Vx-Edition

version 0.7.6

https://github.com/VNSecurityResearch/anm/blob/master/RDG.Packer.Detector.v0.7.6.2017.zip

4/ Exeinfo PE 

Exeinfo PE for Windows by A.S.L. 

http://www.exeinfo.byethost18.com/?i=1

download: https://github.com/ExeinfoASL/ASL

5/ DiE (Detect_It_Easy):

Detect It Easy, or abbreviated "DIE" is a program for determining types of files.

"DIE" is a cross-platform application, apart from Windows version there are also available versions for Linux and Mac OS.

Many programs of the kind (PEID, PE tools) allow to use third-party signatures. Unfortunately, those signatures scan only bytes by the pre-set mask, and it is not possible to specify additional parameters. As the result, false triggering often occur. More complicated algorithms are usually strictly set in the program itself. Hence, to add a new complex detect one needs to recompile the entire project. No one, except the authors themselves, can change the algorithm of a detect. As time passes, such programs lose relevance without the constant support.

Detect It Easy has totally open architecture of signatures. You can easily add your own algorithms of detects or modify those that already exist. This is achieved by using scripts. The script language is very similar to JavaScript and any person, who understands the basics of programming, will understand easily how it works. Possibly, someone may decide the scripts are working very slow. Indeed, scripts run slower than compiled code, but, thanks to the good optimization of Script Engine, this doesn't cause any special inconvenience. The possibilities of open architecture compensate these limitations.

DIE exists in three versions. Basic version ("die"), Lite version ("diel") and console version ("diec"). All the three use the same signatures, which are located in the folder "db". If you open this folder, nested sub-folders will be found ("Binary", "PE" and others). The names of sub-folders correspond to the types of files. First, DIE determines the type of file, and then sequentially loads all the signatures, which lie in the corresponding folder. Currently the program defines the following types:

  • MSDOS executable files MS-DOS
  • PE executable files Windows
  • ELF executable files Linux
  • MACH executable files Mac OS
  • Binary all other files

download: https://github.com/horsicq/DIE-engine/releases


10/26/22

[Reverse] Install Flash Movie Player on Win10 - Series Reversing/Cracking .NET cơ bản bằng tiếng Việt

 Flash đã khai bị khai tử. Vậy làm sao xem các file hướng dẫn Reverse cũ, ví dụ chuỗi tuts Series Reversing/Cracking .NET cơ bản bằng tiếng Việt tại Link: 

https://github.com/levisre/dotnettuts

1/ Cài đặt Flash Movie Player trên Win10: download và install

Flash Movie Player

https://www.eolsoft.com/download/

2/Cài đặt Flash Player Plug-in Installation Manual


Theo hướng dẫn tại: 

https://www.eolsoft.com/freeware/flash_movie_player/flash/

3/Sau khi cài xong sẽ xem được file .swf trên Win10

Benina

Tham khảo thêm các bài viết của Levis's Little Blog about Reverse Code Engineering (RCE) tại:

https://ltops9.wordpress.com/2017/03/08/series-reversingcracking-net-co-ban-bang-tieng-viet/


8/21/22

[Excel] Hướng dẫn xóa external links trong Excel


Đôi khi trong quá trình sử dụng Excel, chúng ta thường nhận được thông báo có liên kết đến nội dung bên ngoài (external links). Thông thường, chúng ta có thể tùy chọn để cập nhật lại nội dung hoặc xóa bỏ các liên kết này. Tuy nhiên, đôi khi vì lý do nào đó mà việc xóa bỏ các liên kết này (break links) không thể thực hiện được. Bài viết hôm nay mình sẽ chia sẽ một số thủ thuật excel giúp các bạn xóa external link trong Excel.

Các external link chứa trong các cell của Excel có thể dễ dàng loại bỏ bằng thao tác:

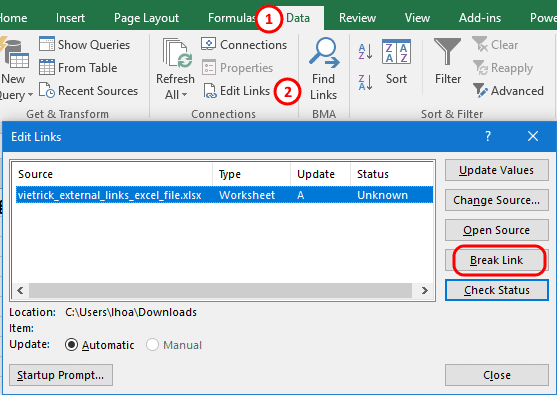
Trong tab Data > Edit Links. Trong hộp thoại Edit Links hiện lên, các bạn chọn link cần xóa và nhấn vào nút Break Link. Một hộp thoại hiện ra, bạn nhấn tiếp vào nút Break Links để xác nhận.

Break excel external link in Cell

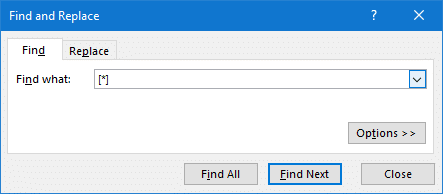
Để nhanh chóng xác định vị trí các Cell chứa external link, các bạn có thể sử dụng tính năng Find and Replace bằng tổ hợp phím Ctrl + F. Sau đó ở ô Find what nhập: [*] để xác định vị trí các Cell.

Find and Replace Excel

Tuy nhiên đôi khi dữ liệu của bạn được chèn ở nhiều nơi, external link không chỉ nằm trong Cell. Vậy nên sau khi thực hiện, các bạn vẫn thấy liên kết chưa bị loại bỏ. Hãy thử tiếp các phương pháp bên dưới.

External Links có thể tồn tại dưới dạng nội dung bên trong các textbox của Chart. Gồm các vị trí sau:

  • Data Labels
  • Axis Labels
  • Chart Title

Các bạn nên kiểm tra dữ liệu tại những vị trí này.

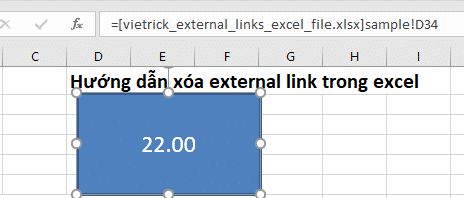
Nếu trong Excel của bạn sử dụng Shape có chứa nội dung textbox. External link có thể nằm trong mục Formula bar.

Break excel external link in Shape

Nếu nội dung có sử dụng nhiều đối tượng Shape, các bạn có thể dùng mẹo sau đây để kiểm tra nhanh:

  1. Nhấn F5 để mở hộp thoại Go To.
  2. Nhấn vào nút Special
  3. Tích chọn vào mục Objects
  4. Nhấn OK

Lúc này chúng ta sẽ chọn toàn bộ đối tượng Shape trong bảng tính. Các bạn nhấn nút Tab để chuyển qua các đối tượng Shape khác nhau. Chú ý nội dung ở ô Formula Bar để kiểm tra external link.

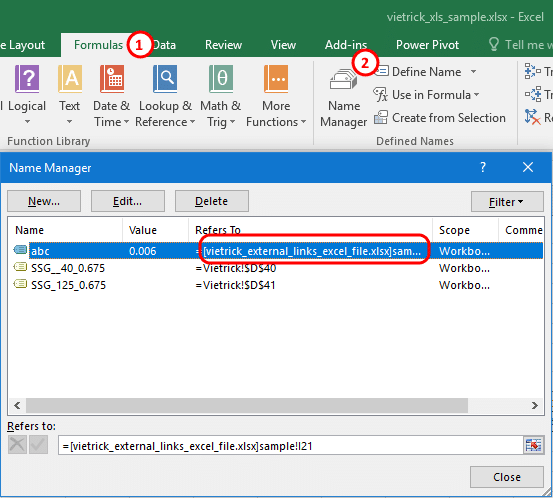
Các bạn chuyển qua tab Formulas > Name Manager. Kiểm tra giá trị ổ cột Refers To trong hộp thoại hiện lên.

Break excel external link in Name Manager

Để kiểm tra dữ liệu trong Pivot Tables, các bạn làm theo các bước hướng dẫn bên dưới:

  1. Click chọn một ô trong Pivot Table.
  2. Chuyển đến PivotTable Tools Analyze Tab.
  3. Click vào nút Change Data Source.
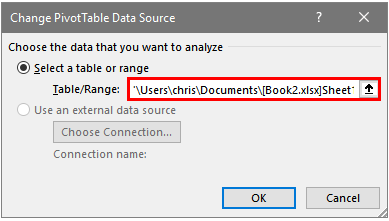
  4. Trong hộp thoại hiện lên, bạn kiểm tra giá trị trong mục Table/Range
Break excel external link in Pivot Table

Các liên kết ngoài cũng có thể chứa trong Data Validation rule trong Excel. Bạn có thể kiểm tra các quy tắc này trong từng worksheet. Tuy nhiên, nếu bạn có nhiều sheet thì hãy làm tận dụng thủ thuật sau để nhanh chóng định vị các external link này.

Sử dụng công cụ The Compatibility Checker để tìm các lỗi Data Validation:

  1. Click vào tab File. Sau đó click vào ô Check Issues, trong menu đổ xuống chọn Check Compatibility.
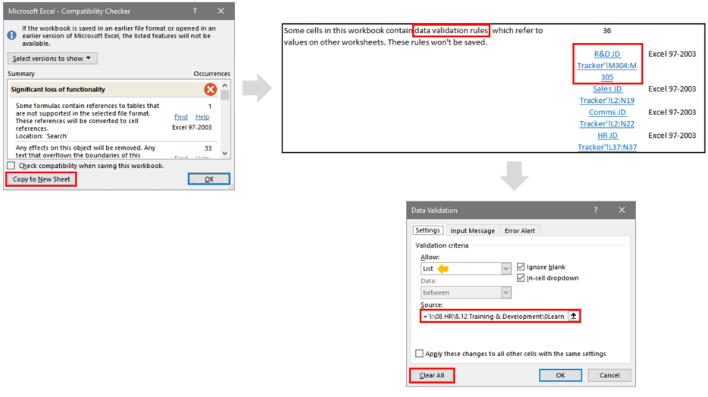
  2. Trong hộp thoại hiện lên, các bạn nhấn vào nút Copy to New Sheet.
  3. Một sheet mới được tạo ra liệt các vấn đề tương thích. Các bạn có thể duyệt tìm các external link với cú pháp tìm kiếm: data validation
  4. Nếu có vấn đề với external link hoặc lỗi tương thích với data validation, bạn sẽ thấy có liên kết nhảy đến vị trí của lỗi. Từ đó giúp bạn dễ dàng định vị và xử lý vấn đề.
Break excel external link in Data validation rule

Thực hiện các phương pháp ở trên, việc tìm kiếm và loại bỏ external link gây tốn thời gian thì các bạn có thể sử dụng add-Ins Find Link để tự động tìm và xóa các liên kết. Các bạn có thể tải về phiên bản FindLink 12.1.

Cài đặt Add-Ins

Sau khi tải về Add-Ins, các bạn tiến hành cài đặt như hướng dẫn bên dưới:

Cài đặt Add-Ins FindLink excel:

Giải nén tệp tải về

Tiến hành giải nén tệp findlink.zip cho kết quả tệp: findlink.xlam

Mở option Excel

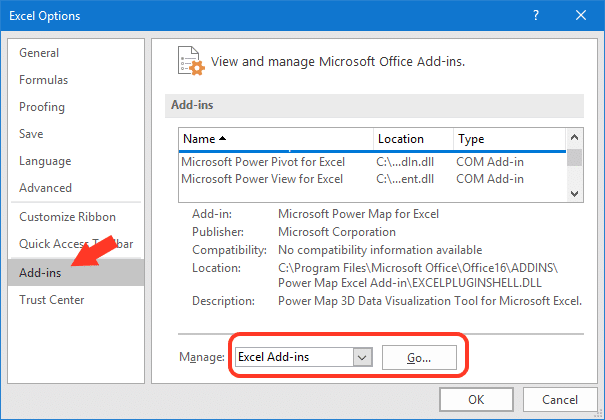
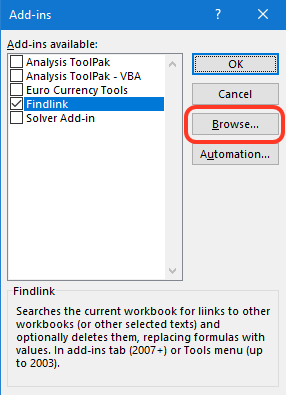
Để tiến hành thêm Add-Ins vào Excel, các bạn vào tab File > Option. Trong tab Add-Ins, mục Manage chọn Excel Add-ins rồi nhấn Go.

Thêm Add-ins vào Excel

Trong cửa sổ Add-ins mở ra, các bạn nhấn nút Browse và trỏ đến tệp findlink.xlam đã tải về ở bước 1. Sau đó nhấn OK để xác nhận.

Lúc này, chúng ta đã cài đặt xong Add-ins Find Link cho Excel.

Sử dụng Add-Ins

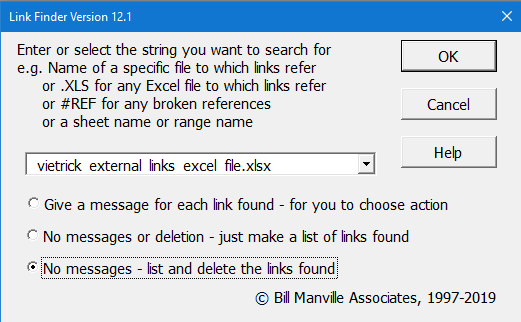
Sau khi cài đặt, để sử dụng add-ins, trên menu Excel, bạn chuyến đến tab Add-ins và nhấn chọn Find Links.

Trong cửa sổ hiện lên, các bạn click chọn liên kết cần xóa bỏ. Sau đó tích vào tùy chọn tương ứng bên dưới rồi nhấn OK.

Excel add in Find Link

Add-Ins Link Finder cung cấp cho chúng 3 option như sau:

  • Option 1: Hiển thị các liên kết tìm thấy, sau đó bạn quyết định sửa hoặc xóa từng liên kết.
  • Option 2: Hiển thị danh sách các liên kết
  • Option 3: Xóa và lập danh sách các liên kết tìm thấy.

Sao chép

Nếu bạn đã thử tất cả các cách ở trên mà không thành công thì hãy tạo 1 bản sao không chứa external link.

Để thực hiện việc này, các bạn hãy tạo 1 bảng tính Excel mới. Sau đó sao chép nội dung từng sheet từ file cũ sang.

Lưu ý khi sao chép hãy để ý ở tab Data, mục Connections. Nếu nút Edit Links sáng lên có nghĩa là nội dung bạn vừa sao chép có dính external links.

Nếu nội dung bị dính external link, hãy thử xóa Cell style rules. Bạn chuyển qua tab Home > Conditional Formatting > Clear Rules > Clear rules from Entire Sheet.

Sau đó hãy thử sao chép lại nội dung trong sheet qua tệp mới. Lặp lại với các sheet khác nếu dính external links.

Link ref: https://www.vietrick.com/huong-dan-xoa-external-links-trong-excel/

8/11/22

[Cracking] Is there a way to crack the password on an Excel VBA Project 64bits?

 how it works

  1. Open the file(s) that contain your locked VBA Projects.
  2. Create a new file with the same type as the above and store this code in Module1

    Option Explicit
    
    Private Const PAGE_EXECUTE_READWRITE = &H40
    
    Private Declare PtrSafe Sub MoveMemory Lib "kernel32" Alias "RtlMoveMemory" _
    (Destination As LongPtr, Source As LongPtr, ByVal Length As LongPtr)
    
    Private Declare PtrSafe Function VirtualProtect Lib "kernel32" (lpAddress As LongPtr, _
    ByVal dwSize As LongPtr, ByVal flNewProtect As LongPtr, lpflOldProtect As LongPtr) As LongPtr
    
    Private Declare PtrSafe Function GetModuleHandleA Lib "kernel32" (ByVal lpModuleName As String) As LongPtr
    
    Private Declare PtrSafe Function GetProcAddress Lib "kernel32" (ByVal hModule As LongPtr, _
    ByVal lpProcName As String) As LongPtr
    
    Private Declare PtrSafe Function DialogBoxParam Lib "user32" Alias "DialogBoxParamA" (ByVal hInstance As LongPtr, _
    ByVal pTemplateName As LongPtr, ByVal hWndParent As LongPtr, _
    ByVal lpDialogFunc As LongPtr, ByVal dwInitParam As LongPtr) As Integer
    
    Dim HookBytes(0 To 11) As Byte
    Dim OriginBytes(0 To 11) As Byte
    Dim pFunc As LongPtr
    Dim Flag As Boolean
    
    Private Function GetPtr(ByVal Value As LongPtr) As LongPtr
        GetPtr = Value
    End Function
    
    Public Sub RecoverBytes()
        If Flag Then MoveMemory ByVal pFunc, ByVal VarPtr(OriginBytes(0)), 12
    End Sub
    
    Public Function Hook() As Boolean
        Dim TmpBytes(0 To 11) As Byte
        Dim p As LongPtr, osi As Byte
        Dim OriginProtect As LongPtr
    
        Hook = False
    
        #If Win64 Then
            osi = 1
        #Else
            osi = 0
        #End If
    
        pFunc = GetProcAddress(GetModuleHandleA("user32.dll"), "DialogBoxParamA")
    
        If VirtualProtect(ByVal pFunc, 12, PAGE_EXECUTE_READWRITE, OriginProtect) <> 0 Then
    
            MoveMemory ByVal VarPtr(TmpBytes(0)), ByVal pFunc, osi+1
            If TmpBytes(osi) <> &HB8 Then
    
                MoveMemory ByVal VarPtr(OriginBytes(0)), ByVal pFunc, 12
    
                p = GetPtr(AddressOf MyDialogBoxParam)
    
                If osi Then HookBytes(0) = &H48
                HookBytes(osi) = &HB8
                osi = osi + 1
                MoveMemory ByVal VarPtr(HookBytes(osi)), ByVal VarPtr(p), 4 * osi
                HookBytes(osi + 4 * osi) = &HFF
                HookBytes(osi + 4 * osi + 1) = &HE0
    
                MoveMemory ByVal pFunc, ByVal VarPtr(HookBytes(0)), 12
                Flag = True
                Hook = True
            End If
        End If
    End Function
    
    Private Function MyDialogBoxParam(ByVal hInstance As LongPtr, _
    ByVal pTemplateName As LongPtr, ByVal hWndParent As LongPtr, _
    ByVal lpDialogFunc As LongPtr, ByVal dwInitParam As LongPtr) As Integer
    
        If pTemplateName = 4070 Then
            MyDialogBoxParam = 1
        Else
            RecoverBytes
            MyDialogBoxParam = DialogBoxParam(hInstance, pTemplateName, _
                       hWndParent, lpDialogFunc, dwInitParam)
            Hook
        End If
    End Function
    
  3. Paste this code in Module2 and run it

    Sub unprotected()
        If Hook Then
            MsgBox "VBA Project is unprotected!", vbInformation, "*****"
        End If
    End Sub