--How to Setup & Encode Content with MeGUI x264 Encoder--
This tutorial will show you how to use MeGUI to create a MP4 or MKV file for your Media Center collection, from your legally owned DVD collection.
I will not cover how to decrypt.
This tutorial will be in 2 parts:
Part 1: Installing,setting up,and configuring everything needed as well as the configuring the encoder itself.
Part 2: The actual encoding process.
Theres alot of info. to cover so lets get started.
Step 1: The Essential Tools & Utilities
1) Shark007's Codec pack (optional)
If you plan on using WMC for playback, and wish to use FFDshow as the decoder, you will need the 64bit add on as well.
However, for the purposes of MeGUI, only the 32bit package is needed.
[Please Note]
You do not actually need any 3rd party Codecs such as FFDShow or Sharks codec pack. Both DVD and BluRay can be indexed and encoded with built in codecs.
Extracting BluRay video streams to MKV format is the easiest way to work with them.
You will need Haali splitter for these MKVs but if using Shark007s package, it is included.. You will need it only if you decide not to use this codec package.
2) AVISynth
This will be needed to create the Avisynth scripts required by the x264 encoder
-Required for MEGUI to funtion properly-
3) MeGUI
The GUI for the x264 encoder
4) Nero AAC Codec
An excellent quality AAC audio encoder capable of not only stereo AAC, but 5.1 surround as well
-Optional, but highly recommended-
So in short, if you do not wish to mess with any codecs:
You MUST have MeGUI, AVISynth for DVDs.
For BluRay you will need a MKV splitter such as Halli.
For both DVD and BluRay, you can use the file indexer.
Step 2: Installation & Setup
If you opt to use FFDshow or Sharks Codec package, here are some suggestions for setting it up to play nicely with MeGUI. If you do NOT wish to use 3rd party codecs, and are using indexing/MS codec skip this part and move on to step 2.
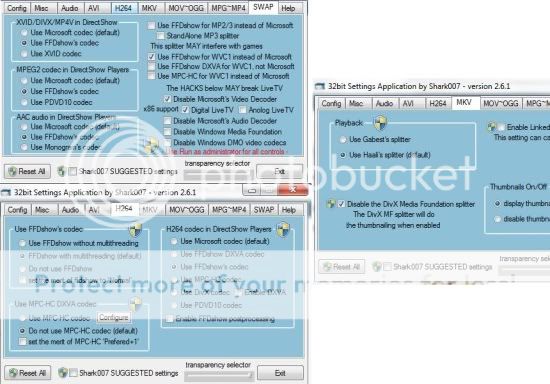
1) Install Shark007's codecs as you normally would
In the 32bit app, run it as administrator and make sure the following settings are set properly.
A. In the H264, make sure that "use FFDshow" is checked on the left and right Panel
B. In the swap tab, make sure "Use FFDshow"
C. Make sure use FFDshow forWVC1 in Direct Show players
--Swapping WVC1 and h264 allows for FFDshow to decode Bluray streams.
It is not needed for decoding DVD
D. Disable the DivX Splitter
This tutorial will show you how to use MeGUI to create a MP4 or MKV file for your Media Center collection, from your legally owned DVD collection.
I will not cover how to decrypt.
This tutorial will be in 2 parts:
Part 1: Installing,setting up,and configuring everything needed as well as the configuring the encoder itself.
Part 2: The actual encoding process.
Theres alot of info. to cover so lets get started.
Step 1: The Essential Tools & Utilities
1) Shark007's Codec pack (optional)
If you plan on using WMC for playback, and wish to use FFDshow as the decoder, you will need the 64bit add on as well.
However, for the purposes of MeGUI, only the 32bit package is needed.
[Please Note]
You do not actually need any 3rd party Codecs such as FFDShow or Sharks codec pack. Both DVD and BluRay can be indexed and encoded with built in codecs.
Extracting BluRay video streams to MKV format is the easiest way to work with them.
You will need Haali splitter for these MKVs but if using Shark007s package, it is included.. You will need it only if you decide not to use this codec package.
2) AVISynth
This will be needed to create the Avisynth scripts required by the x264 encoder
-Required for MEGUI to funtion properly-
3) MeGUI
The GUI for the x264 encoder
4) Nero AAC Codec
An excellent quality AAC audio encoder capable of not only stereo AAC, but 5.1 surround as well
-Optional, but highly recommended-
So in short, if you do not wish to mess with any codecs:
You MUST have MeGUI, AVISynth for DVDs.
For BluRay you will need a MKV splitter such as Halli.
For both DVD and BluRay, you can use the file indexer.
Step 2: Installation & Setup
If you opt to use FFDshow or Sharks Codec package, here are some suggestions for setting it up to play nicely with MeGUI. If you do NOT wish to use 3rd party codecs, and are using indexing/MS codec skip this part and move on to step 2.
1) Install Shark007's codecs as you normally would
In the 32bit app, run it as administrator and make sure the following settings are set properly.
A. In the H264, make sure that "use FFDshow" is checked on the left and right Panel
B. In the swap tab, make sure "Use FFDshow"
C. Make sure use FFDshow forWVC1 in Direct Show players
--Swapping WVC1 and h264 allows for FFDshow to decode Bluray streams.
It is not needed for decoding DVD
D. Disable the DivX Splitter
2)Install AviSynth
3) If you will be working with BluRay or using MKVs, and you are NOT using Shark007s package:
install Haali Splitter now
4)Run & Update MeGUI
On first run, it will ask to update. Allow it.
When it is done, you will get a few pop ups (profiles) as well as a window asking to restart MeGUI.
-->>> Do NOT restart it just yet <<<-- b="b">
Right click each of the profile windows and choose "import all"
If asked to overwrite a profile, say yes to all.
After all is imported, select yes to restart MeGUI.
-Program Directories-
At this point Browse to the Tools Folder in the MeGUI directory.
Create a new folder "Nero" and put the neroAacEnc.exe file in it.
(From the Nero zip package you downloaded in the Win32 folder)
--Step 3: Setup Defaults & External Sources--
1) Set Auto Encode Defaults
Open MeGUI.
At the top click options, and then Settings.
Click the Extra config Tab.
Click the Auto Encode Defaults button.
Here you can set what MeGUI will default to when you use the Auto encode button in the encoder.

I would recommend either the MKV or MP4 container, and the "No target size" option.
This way, the encoder will not care about file size, but use your settings instead.
File size can be targeted however from within the encoder.
Keep in mind, the choice of conatainer is only what MeGUI defaults to when you choose Auto Encode. Even then, it can still be changed at any time.
** MP4 Containers are best used for files that are 4GB or less in size. MKV is best used for anything larger than 4GB.
2) Set External Program Directories
In the External Program Settings, choose the location of neros aac encoder, as well as Besplit if you chose to install it as well.
Step 4: Setting up the Encoder (x264):
Save your settings and return to the Main screen.

1) In the section "Encoder Settings" click the drop down box
a. IF you are dealing with HD content (BluRay or HD Camcorder) as a Source
and you wish to have the option of creating a AVCHD Disc:
choose x264 AVCHD (DVD 5/9)
b. For DVD content, or smaller resolutions, the
x264 Max Compatability (DXVA) is also an excellent choice.
((Keep in mind this will not be AVCHD compatable if for example you decide to upscale your DVD to 720P or 1080P))
The settings for DXVA will be basically the same. the only difference will be 5 ref. frames (if you choose) and a larger Video Buffer.
2) Then click the Config button, just to the right
This AVCHD setting is optimized for AVCHD playback, and primarily HD video.
However, its an excellent base to start from and can be used for DVD encodes as can also be used for DVD if you so choose.
Furthermore, the settings it uses will guarantee a smooth playback from most any source.
Some of the settings you can experiment with & fine tune to your liking.
I will try to highlight them the best I can, and give my own personal recommendation as to what I found works best for me.
MAIN SETTINGS:
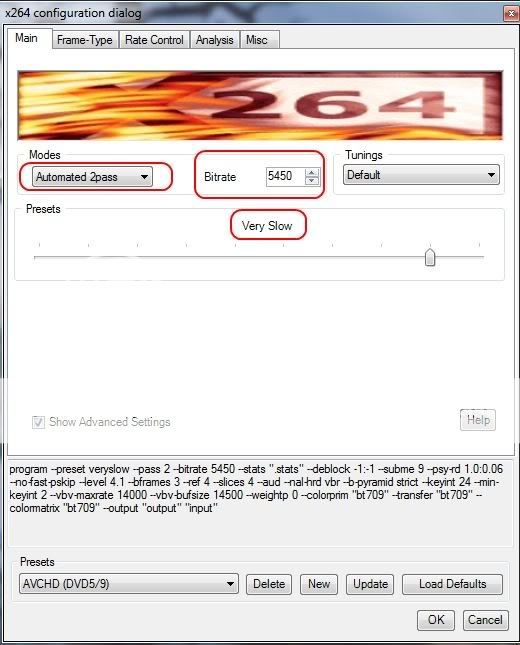
Modes: Automated 2 Pass OR Const. Quality are really the only 2 worth looking at here IMHO.
Automated 2 Pass: First pass will make predictions along the way as how best to encoded the video. Where it can lower bit rate, where it needs more etc.
The second Pass will use this info to its advantage to encode the file.
The result will average the bit rate you choose. This is a excellent choice for those who wish to hit a particular file size, or accurately predict the final file size.
Constant Quality does 1 pass, attempting to keep a constant quality throughout with no regard to bitrate or file size.
Lower Values = Higher Quality Higher Values = Lower Quality
This one is faster tha a 2pass encode. the disadvantage is that it impossible to predict how large a file will be be, or what the avergae bit rate will be. Depending on your setting, x264 encodes the video while maintaining a percieved quality throughout.
I would recommend a Automated 2 Pass for most encodes. However, CQ encodes are faster with good quality. The downside is they are very unpredictable on files size from 1 video to another. But over a large number of video the avergae size per video is reasonable.
Constant Quality at a setting if 18-19 gives very good results.
If you want perfect quality you can try as low as 16, but likely not worth the effort.
Personally, I like 17-17.5.
File sizes and bit rates will vary dramatically video to video. But over quite a few encodes, it will start averaging out.
Presets: Adjust the encoder settings to a preset value. I would set this at Very Slow, then make a few tweaks as shown a bit later in this tutorial.
Bitrate: Likely the largest factor in the quality of the final product. In general, higher bit rates = better quality.
Bit Rate Recommendations for 2 Pass Encodes:
DVD-> Absolute Min: 1000 bitrate. Recommended 1500 - 2000
BD/HD-> Absolute MIN: (For 720P) 4000 bitrate (For 1080P) 8000 bitrate
Recommended: (720P) = 5400-6200 (1080P) = 11000 - 14000
Note: These are my own recommendations to produce high quality encodes. You may find lower bitrates are perfectly fine or these are overkill for your specific needs. I/E a mobile device can get by with lower bitrates as flaws will not show as it would on say a 60" Plasma. It depends on the intended use of the final encode. Bit rate can also be dependant on the source. If the source has little action, or lots of close ups etc. More action and busy scenes will require higher bitrates where as lots of closeups and simple scenes need less. Just experiment here, but these are good starting guidelines.
Personally, I would not recommend going below the absolute Min I have suggested, but its your call.
FRAME TYPE:
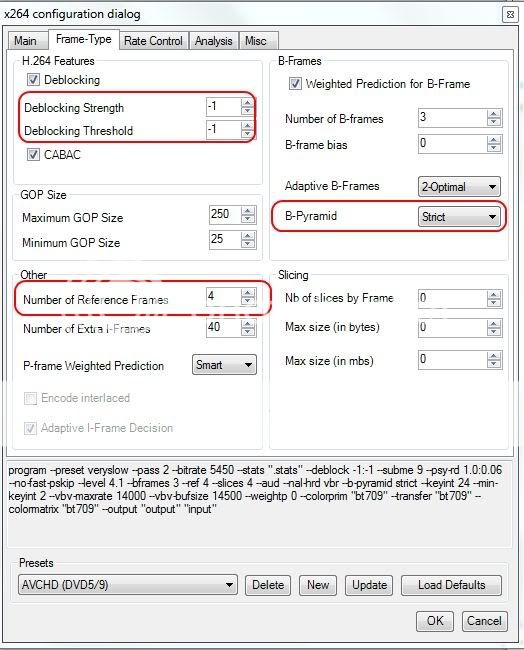
**Do not disable deblocking. Deblocking is a key feature of the x264 encoder and will not function correctly without it.
Higher values will deblock more (softening effect)
Lower Value less,and tend to produce a slightly sharper image.
I like the -1 setting. You can try -2,0, or +1 to see which you like the best.
If you want the target to be Bluray/AVCHD compatable, Ref Frames must be 4.
If you are using the DXVA profile for DVD, I would recommend either
4 or 5 Ref. frames. Any more than 5 will not really help anything.
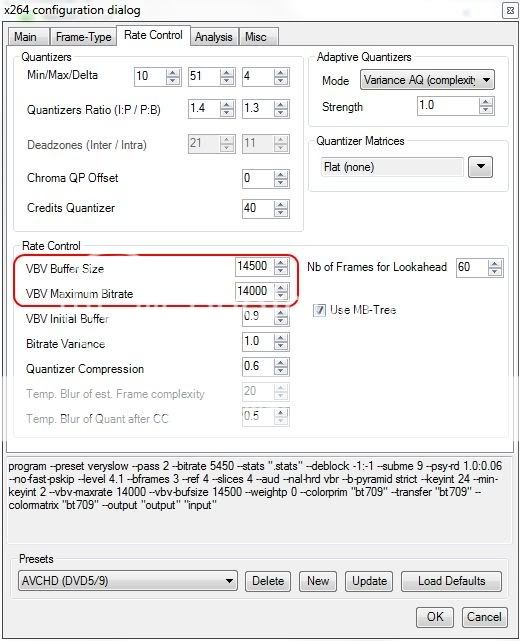
RATE CONTROL:
Higher values will deblock more (softening effect)
Lower Value less,and tend to produce a slightly sharper image.
I like the -1 setting. You can try -2,0, or +1 to see which you like the best.
If you want the target to be Bluray/AVCHD compatable, Ref Frames must be 4.
If you are using the DXVA profile for DVD, I would recommend either
4 or 5 Ref. frames. Any more than 5 will not really help anything.
RATE CONTROL:
ANALYSIS:
In the analysis tab there are a couple key settings that not only help in overall quality, but impact encoding time as well. Some, Significantly.

ME RANGE: 16 is usually a good setting for DVD or lower resolution encodes, higher values do not seem help alot for DVD.
24 is a good setting for 720P or 1080P Material, and it does help slightly with HD material.
This setting also has a minor impact on encoding time.
I still prefer a setting of 24 over 16 for HD.
ME Algorithim & Refinement:
These settings have a significant impact on encoding time.
Algorithm should be set to HEX for best results.
Lower values can speed up encoding time, but produce lesser quality encodes.
Higher Values produce better results at a huge impact to encoding time.
Although, the quality improvement is very little to none, and does not justify the additional encoding time IMHO.
For refinement, the lower the setting, the faster the encode will be.
This also affects quality.
I have found a setting of 9 is a good balance between quality and speed. Although still a bit slow.
If your encoding time are too long for your tastes, you can try these settings:
(ME Range:16 -- Algorithm:Multi-Hex -- Subpixil Refinment: Lvl 7)
This will speed up the encoding process but with a loss in image quality. Although, the results should still be good. Personal preference here.
Psy Trellis Strength: Trellis attempts to sharpen the image a bit more than what Trellis already does. For the most part, Ive had good luck with a setting of .6 for HD content and .4 for DVD content. But in some causes it will cause holoing or ringing.
Safe bet is leave it at 0. The improvement isnt that much anyway.
No FastPskip Fast Pskip help decrease encoding time. It does however, occasionly produce some blocky results because of it.
I recommend not using Fast Pskip. Check it to disable it.
Its impact on encode time is minor.
MISC
Threads Input: leave
this set to 0 (which is auto). MeGUI will assign the proper threads it
needs. Messing with this will only produce negative results and will not
speed anything up.
Slow First Pass: As mentioned earlier, in a 2 pass encode the encoder makes predictions, and determines the optimal way to encode a particular video.
It then uses the information collected, to make better desicions in the encoding process of Pass 2.
Slow first Pass means just that. It will take just as long to make a 1st pass as it does to make the second.
For example, if we have a 60min video.
Lets assume the 1st pass takes 1hr to complete. The second pass will as well.
This leaves a 2hr encoding time.
If this option is off, the 1st pass will take approx. 1/2 as long as the 2nd.
1st pass 30min, Second pass 1hr = 1 hr 30min encode time.
A slow 1st Pass will produce better results than a faster 1st pass. But its hardly noticeable.
Considering the impact on encoding time VS results, my opinion its best left off.
Your call here.
Please note the Custom Command Line. These are overides for any settings changed, to enforce AVCHD compatability.
If you wish to remove them and use all of your own settings, make & save a new custom profile.
Some of these settings you may wish to experiment with, and see what you like the best.
Custom Profiles
If you make changes to the original profile, you may wish to create your own custom profile rather than overwriting the original. In fact, I would recommend you do so.
At the bottom of the x264 Config. Window, you see a dropdown box labeled "Presets"
Click the NEW button the the right, and name your profile what ever you choose. This will then create a new profile with your desired settings and save it, keeping the original intact.
Please Note: If your content is HD content, and you have any plans on creating a AVCHD disc later (as a back up) it is extremley important certain key settings remain intact.
In the Misc Tab, these key settings are entered in the section "Custom Comand Line"
As you can see, settings such as Reference Frames, Key Int., and buffer size will override any setting you change in the encoder. This is done to keep the encode AVCHD compatable.
If you delete all thats in the Custom Command Line, any setting you specifically set will be used instead for these values.
Thats the basics of the x264 settings, and setting it up for use with FFDshow.
Now to encode something ...
--Prepare the Video for Encoding--
Step 1 -- Creating an AVIsynth Script
1) Copy the target Source to your HD (DVD or BD)
2) Create the Avisynth script.
This part will be slightly different depending on the Source (DVD or BD) but largely the same. BD will be slightly different and I will cover the differences after the DVD section.
1: Create the Script
FOR DVD Content (AviSynth Script)
1) Click the Tools Tab at the top of MeGUIs main screen and choose "File Indexer"
2) Click the button to the right of the Input File box, and go to the location of the DVD on your HD.
There will be several .VOB files. The one you want is the very first .VOB of a .99GB size.
Once its loaded, please take note of the information it gives you. As you can see in my sample here, it tells us everything we need to know.
this sample is a MPEG2 Video, its Interlaced, and has a 5.0 AC3 Audio track.

3) Once you are ready, Click the Queue Button.
4) In the Megui Main Window, go to the Queue Tab and press the "Start" button in the bottom left. This will start the job.
2: Editing the Script: (Deinterlacing)
Once the DVD has been indexed, you will get a Window that looks like this:

Notice the lines in the image?
These are interlace lines. If you remember from the 1st step, before actually indexing, it already told us the video was interlaced.
1) To de-interlace the video, go to the "Filters" Tab.
2) In the De-Interlacing box, simply press the analyze button.
MeGUI will now decide the best appropriate action.
If you didn't catch whether it was interlaced or not, running an analysis will not hurt anything, just to be sure.
If MeGUI determines the video is progressive, it will tell you and do nothing. So theres nothing to loose by running it.

3) For some DVDs, you may wish to also check the Noise Filter. How strong, is utimately up to you and how much noise the original actually has.
I would recommend either None, or Minimal.
3: Editing the Script: (Cropping and Resolution)
In the I/O tab of the script creator there a few key settings. Primarily the resolution.
Crop:
1) If you wish to crop your video, crop it 1st.
You can do so manually, or let MeGUI decide with the AUTO option.
2) Resize.You have a couple options here.
A. For Fullscreen, If you do nothing, or simply click the Resize box, MeGUI will encode the video at its native resolution.
In this case 720x480.
->However, I would recommend using the "Suggested Resolution Mod16" option. this will keep the video in multiples of 16, that the x264 can handle much more efficently.

B. If the source is a Widescreen 'anamorphic"
Then use the Clever Anamorphic option. the x264 encoder will encode the video as a anamorphic encode.
You find this information on the back of the DVD case.
4: Editing the Script: (Resize Filters)
1) Choose your desired resize filter.
In the in Filters Tab, in the bottom box, you'll see Resize Filters.
These are different methods the encoder will use to resize the video.
Some have a softening effect, some neutral, others a sharpening effect.
I prefer Lanczos myself.
It is a sharp resize filter, meaning it tends to sharpen the image.
The downside is it can also produce haloing, or a "ringing" effect if the bitrate is to low.
This one is best suited for original resolution or smaller.
Lanczos4 is quite similar, but I find it is more suited to 'upsizing".
If your going for really low bitrates, you will be better off using a soft or neutral resizer, such as Bilinear
5: Upscaling the Resolution (Optional)
You can also "upsize" if you so choose. Although we can not do that from here.
Lets say we have a 'anamorphic" Widescreen Source.
1) Crop the black bars so that we are left with a 720X400 image. (16x9)
2) Go to "Script Tab" and edit your resolution manually as shown below.

Remember, if you choose this option, you will need to raise your bitrate to comply with 1280x720 or 1920x1080 resolutions.
I would also suggest the Lanczos4 resizer for upsizing DVD content.
Personlly, I would not upscale DVD to 720 or 1080P resolutions.
Although there are little gains, the final file size and bitrate required make not worth the effort.
For Widescreen DVD, one option I find works well is this.
Create the script as normal, using a mod 16 resolution, and Lanczos4 resize. Change the resolution to 768x432.
For a Widescreen DVD this works out well, because:
1) Its technically not upscaling the video. Its just as many pixels as the original 720x480 anamorphic (just a bit less actually)
2) The resolution is a true 16:9, 1.778 aspect ratio.
*Note: Some changes may require you to hit the "Preview AVIsynth Script" button to see the changes.
Once you are satisfied with your script press the "SAVE" button.
Once you save the script, MeGUI will save it, and reopen the edited script.
FOR HD Content (AVISynth Script)
For HD content, creating the script is much the same. However some differences.
You will not be indexing the source for instance, UNLESS it is a MPEG2 source.
1) Go To Tools, HD Streams Extractor
2) For Input, browse to the location on your HD where the disc was saved.
The target folder should be the Stream folder. (Inside the BDMV Folder)
The stream extractor will parse the info and give a list of titles in the folder.

3) Select the main title. It will give you all the information you need.
Video Codec, Audio Codec, Subs etc.
4) Extract the Video Source as MKV. And the Audio Source as AC3, or DTS if you prefer.
(Only choose DTS if you plan on keeoping original audio. otherwise, just convert to AC3 now)
5) If you want the option open to create a AVHD disc in the future, and wish to retain the original Chapters extract them as well.
If you use the Auto Encode option, MeGUI will encode Video/Audio and mux it into the container of your choice. if you wish to add the original chapter list, simply queue the Video and Audio (if it applies) jobs seprately, and manually mux into a MKV container. You will then have the option to add the Chapter list.
6) Once you make your selection and file type choices, Queue the job and run it from the Queue Tab in MeGUI.
NOTE**If the target was MPEG2, at this point you would Index the MKV file using File Indexer, just as you would a DVD.
Then Skip to step 8. Otherwise, Continue on..
7) Once extracted, at MeGUIs main screen, go to TOOLS, AVS Script Creator.
8) Browse to the MKV file you just extracted and open it.

9) HD content is 24FPS Progressive, so there will be no need to de-Interlace (Unless 1080i)
Just simply downsize to 1280x720, or keep the 1920X1080 resolution whichever you prefer.
Also, denoising HD content is not needed.
IMHO, theres not a huge difference between 720P and 1080P, especially if being viewed on 46" or smaller screen.
Whatever route you decide, keep in mind, Higher bit rate 720P will not only be smaller, but will look better than a low bit rate 1080P.
1080P is just over double the amount of pixels.
Step 2 -- Audio
Decide wether you want to use the original Audio, or compress it.
If you choose to compress you have 2 options.
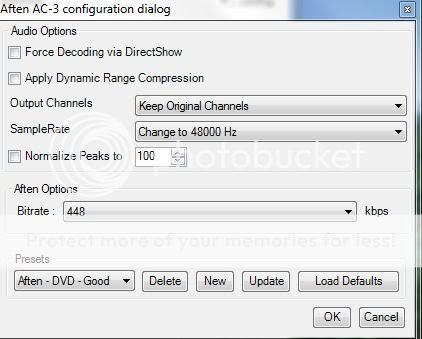
1) Aften AC3. This will recode to AC3.
The best use, IMHO, for this is if you want to down size a AC3 640 audio file to 448 5.1 surround to save some space, or comaptability reasons.
Convert 5.1 surround to a lower bit rate stereo AC3 file.
Anything lower than 448 for AC3, you are better off just using NeroAAC.
2) Nero AAC. this is actually a very good quality audio encoder with Excellent compression, and can be 2.0 or 5.1 channels.
Also, Nero LC 96kbs, is the one you want to select.
Then raise the bit rate in the options menu. For 5.1, I would set it for at least 285kbps up to 448 if you wish.
Nero HE & HEPS are low bitrate (high effeciency). Up to 96kbps.

With the Nero AAC codec, you can choose to keep the original channels, or downmix to stereo.
I wouldn't use the "normalize" option however, as its just a 1 pass solution and doesnt seem to work that great. At least to me.
But to each their own, if you like it, use it
Aftens Setup is Quite Similar:

Step 3: Setting Bitrate
Since we already covered the x264 settings in the first part, no point going over it again.
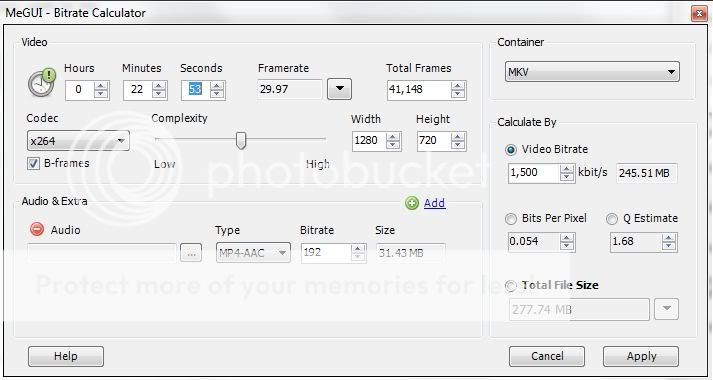
But, I want to cover a bit about the bitrate calculator..
Previously I mentioned setting the MeGUI defaults to whichvern conatiner you prefer (MP4 or MKV) as well as "No Target Size" .
If you have a file size you wish to hit or just wish to see about how large the file will be:
Go to Tools, and choose "BitRate Calculator"

The bit rate calculator is an excellent tool to get an idea of the final File Size, as well as to adjust the bitrate to hit a target size.
Most of the info should be already be loaded from your setting in the main MeGUI window.
Double check the bit rate of audio, and the file type matches. (Output target) as well as the length of the film.
To estimate the file size for your current settings:
In the Video Bitrate, put in the bitrate you wish to use and MeGUI will estimate the fianl file size at those settings.
To specify a certain File Size:
Choose, "Total File Size" and manually put in what size you wish the file to be. MeGUI will then calculate what bitrate will be needed to hit that goal.
Also, you can experiement how the different containers will impact the final size.
For example, MP4 containers have slightly more overhead than a MKV. (usually just 1 or 2MB)
And MT2S containers will have a couple hundredMB overhead, depending on the length of the video.
Once you have decided what bitrate you need/want, go back to MEGUI main screen.
Press the "Config" to the right of "Encoder Settings" and put in the desired bit rate.
(if you did not choose to have it automatically set in the bitrate calculator)
If file Size is not a concern, put in any value you see fit or that I recommended earlier.
Step 4: Encoding the Video:
-->If you have chosen to compress the audio, all you need to do now is simply hit the "AUTO ENCODE" button in the bottom right corner.
1) In the windows that pops up, double check you container preference.
2) If all OK, Press Queue.
3) Then in the Queue Tab, press start.
When MEGUI is finished, you will have a playable MP4 or MKV, whichever you chose.

--> If you are keeping the original Audio Stream
1) Change the File Format to RAWAVC
2) Press the Enqueue button, in the Video encoding section of the main screen.
3) In the Queue tab, Press the Start button to begin encoding.
When MeGUI is finished, you will have a H264 file in the destination directory you choose.
3) In tools, go to Muxer, and choose MP4 or MKV (whichever you prefer)

Video Input = the H264 File you just encoded.
Audio = the original Audio Source.
4) You can also name the final output now, as well as additional settings such as languages.
5) Press the Queue button
6) Go to the Queue Tab in MeGUIs main windows, and press start to begin muxing the file.
Lossless Videos
Some may wish to have the BluRay content as a lossless file rather than downsizing or compressing the video.
To each their own, and fortunately for those who wish to do this, there is no extra software needed.
MeGUI has all the tools we need.
Simply follow the steps to extract the HD Video and Audio Streams as if you were going to encode the Video.
When the streams are extracted, go to Tools Menu & open MKV Muxer
In the Muxer simply add your video Stream and Audio Stream.
Mux them together and name the file.
You now have a lossless copy of the disc in the form of a MKV file
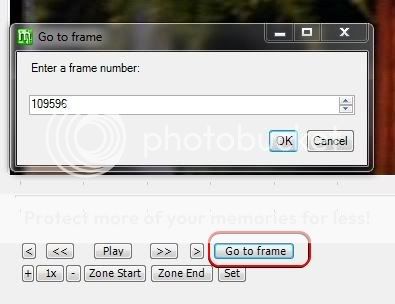
BeSPLIT (Optional)
There may be occasions when you want to cut part of a film. Either the beggining, or perhaps the credits.
If for whatever reason you wish to do this, this is how you use BeSplit.
1) From the Tools Menu, open AVS Cutter.
2) Browse to and open your AVIsynth Script.
3) You will now have you Script Preview Window open again.

You can play, Stop, Pause or seek anywhere you wish.
4)Once you find the point you want the video to start at, press the "Go To Frame" button and copy that frame number to the AVS Cutter Window.
5)Repeat for the frame number you want the video to end at.

6) Now that you have your start point, and end point Press the "Add Button"
7) Next Press the "Add cuts to scirpt" button. (This will add the cuts to the video itself.
8) Press 'Save Cuts File"
You can now close the AVS Cutter. We are done with the video part.
Next, Go to TOOLS, and choose Audio Cutter.

10) Here, the input file is the original, unaltered audio file.
11) Add the cut file, the one we just made in the previous step.
12) Name it something so you know which Audio File it is. Such "CutAudio"
13) Next Create Job, and then go to the Queue tab in MeGUI and start the job.
If you are recoding (or compressing) the audio, once you have your cut audio file is created
you can now add it in the MeGUI main Window, in Audio Input Section (in place of the original audio stream)
And thats it for BeSplit
If you wish to make a backup of your HD video, and followed the AVCHD guidlines, you can seem my AVCHD Disc Tutorial here:
AVCHD Disc (How to create)
Keep in mind that not only are Encoder settings important, but final file sizes as well. More info in the AVCHD tutorial.
I know this doesn't cover all the details, but it should cover the basic principle.
MeGUI can be quite overwhelming at first, and there is a lot to learn. Especially if you are just learning.
I hope that this actually helps make it easier to get the hang of, and not just more confusing.
If anyone has any questions about MeGUI that I have not covered feel free to ask and i will do my best to answer.
Step 1 -- Creating an AVIsynth Script
1) Copy the target Source to your HD (DVD or BD)
2) Create the Avisynth script.
This part will be slightly different depending on the Source (DVD or BD) but largely the same. BD will be slightly different and I will cover the differences after the DVD section.
1: Create the Script
FOR DVD Content (AviSynth Script)
1) Click the Tools Tab at the top of MeGUIs main screen and choose "File Indexer"
2) Click the button to the right of the Input File box, and go to the location of the DVD on your HD.
There will be several .VOB files. The one you want is the very first .VOB of a .99GB size.
Once its loaded, please take note of the information it gives you. As you can see in my sample here, it tells us everything we need to know.
this sample is a MPEG2 Video, its Interlaced, and has a 5.0 AC3 Audio track.

3) Once you are ready, Click the Queue Button.
4) In the Megui Main Window, go to the Queue Tab and press the "Start" button in the bottom left. This will start the job.
2: Editing the Script: (Deinterlacing)
Once the DVD has been indexed, you will get a Window that looks like this:

Notice the lines in the image?
These are interlace lines. If you remember from the 1st step, before actually indexing, it already told us the video was interlaced.
1) To de-interlace the video, go to the "Filters" Tab.
2) In the De-Interlacing box, simply press the analyze button.
MeGUI will now decide the best appropriate action.
If you didn't catch whether it was interlaced or not, running an analysis will not hurt anything, just to be sure.
If MeGUI determines the video is progressive, it will tell you and do nothing. So theres nothing to loose by running it.

3) For some DVDs, you may wish to also check the Noise Filter. How strong, is utimately up to you and how much noise the original actually has.
I would recommend either None, or Minimal.
3: Editing the Script: (Cropping and Resolution)
In the I/O tab of the script creator there a few key settings. Primarily the resolution.
Crop:
1) If you wish to crop your video, crop it 1st.
You can do so manually, or let MeGUI decide with the AUTO option.
2) Resize.You have a couple options here.
A. For Fullscreen, If you do nothing, or simply click the Resize box, MeGUI will encode the video at its native resolution.
In this case 720x480.
->However, I would recommend using the "Suggested Resolution Mod16" option. this will keep the video in multiples of 16, that the x264 can handle much more efficently.

B. If the source is a Widescreen 'anamorphic"
Then use the Clever Anamorphic option. the x264 encoder will encode the video as a anamorphic encode.
You find this information on the back of the DVD case.
4: Editing the Script: (Resize Filters)
1) Choose your desired resize filter.
In the in Filters Tab, in the bottom box, you'll see Resize Filters.
These are different methods the encoder will use to resize the video.
Some have a softening effect, some neutral, others a sharpening effect.
I prefer Lanczos myself.
It is a sharp resize filter, meaning it tends to sharpen the image.
The downside is it can also produce haloing, or a "ringing" effect if the bitrate is to low.
This one is best suited for original resolution or smaller.
Lanczos4 is quite similar, but I find it is more suited to 'upsizing".
If your going for really low bitrates, you will be better off using a soft or neutral resizer, such as Bilinear
5: Upscaling the Resolution (Optional)
You can also "upsize" if you so choose. Although we can not do that from here.
Lets say we have a 'anamorphic" Widescreen Source.
1) Crop the black bars so that we are left with a 720X400 image. (16x9)
2) Go to "Script Tab" and edit your resolution manually as shown below.
Remember, if you choose this option, you will need to raise your bitrate to comply with 1280x720 or 1920x1080 resolutions.
I would also suggest the Lanczos4 resizer for upsizing DVD content.
Personlly, I would not upscale DVD to 720 or 1080P resolutions.
Although there are little gains, the final file size and bitrate required make not worth the effort.
For Widescreen DVD, one option I find works well is this.
Create the script as normal, using a mod 16 resolution, and Lanczos4 resize. Change the resolution to 768x432.
For a Widescreen DVD this works out well, because:
1) Its technically not upscaling the video. Its just as many pixels as the original 720x480 anamorphic (just a bit less actually)
2) The resolution is a true 16:9, 1.778 aspect ratio.
*Note: Some changes may require you to hit the "Preview AVIsynth Script" button to see the changes.
Once you are satisfied with your script press the "SAVE" button.
Once you save the script, MeGUI will save it, and reopen the edited script.
FOR HD Content (AVISynth Script)
For HD content, creating the script is much the same. However some differences.
You will not be indexing the source for instance, UNLESS it is a MPEG2 source.
1) Go To Tools, HD Streams Extractor
2) For Input, browse to the location on your HD where the disc was saved.
The target folder should be the Stream folder. (Inside the BDMV Folder)
The stream extractor will parse the info and give a list of titles in the folder.
3) Select the main title. It will give you all the information you need.
Video Codec, Audio Codec, Subs etc.
4) Extract the Video Source as MKV. And the Audio Source as AC3, or DTS if you prefer.
(Only choose DTS if you plan on keeoping original audio. otherwise, just convert to AC3 now)
5) If you want the option open to create a AVHD disc in the future, and wish to retain the original Chapters extract them as well.
If you use the Auto Encode option, MeGUI will encode Video/Audio and mux it into the container of your choice. if you wish to add the original chapter list, simply queue the Video and Audio (if it applies) jobs seprately, and manually mux into a MKV container. You will then have the option to add the Chapter list.
6) Once you make your selection and file type choices, Queue the job and run it from the Queue Tab in MeGUI.
NOTE**If the target was MPEG2, at this point you would Index the MKV file using File Indexer, just as you would a DVD.
Then Skip to step 8. Otherwise, Continue on..
7) Once extracted, at MeGUIs main screen, go to TOOLS, AVS Script Creator.
8) Browse to the MKV file you just extracted and open it.
9) HD content is 24FPS Progressive, so there will be no need to de-Interlace (Unless 1080i)
Just simply downsize to 1280x720, or keep the 1920X1080 resolution whichever you prefer.
Also, denoising HD content is not needed.
IMHO, theres not a huge difference between 720P and 1080P, especially if being viewed on 46" or smaller screen.
Whatever route you decide, keep in mind, Higher bit rate 720P will not only be smaller, but will look better than a low bit rate 1080P.
1080P is just over double the amount of pixels.
Step 2 -- Audio
Decide wether you want to use the original Audio, or compress it.
If you choose to compress you have 2 options.
1) Aften AC3. This will recode to AC3.
The best use, IMHO, for this is if you want to down size a AC3 640 audio file to 448 5.1 surround to save some space, or comaptability reasons.
Convert 5.1 surround to a lower bit rate stereo AC3 file.
Anything lower than 448 for AC3, you are better off just using NeroAAC.
2) Nero AAC. this is actually a very good quality audio encoder with Excellent compression, and can be 2.0 or 5.1 channels.
Also, Nero LC 96kbs, is the one you want to select.
Then raise the bit rate in the options menu. For 5.1, I would set it for at least 285kbps up to 448 if you wish.
Nero HE & HEPS are low bitrate (high effeciency). Up to 96kbps.

With the Nero AAC codec, you can choose to keep the original channels, or downmix to stereo.
I wouldn't use the "normalize" option however, as its just a 1 pass solution and doesnt seem to work that great. At least to me.
But to each their own, if you like it, use it
Aftens Setup is Quite Similar:
Step 3: Setting Bitrate
Since we already covered the x264 settings in the first part, no point going over it again.
But, I want to cover a bit about the bitrate calculator..
Previously I mentioned setting the MeGUI defaults to whichvern conatiner you prefer (MP4 or MKV) as well as "No Target Size" .
If you have a file size you wish to hit or just wish to see about how large the file will be:
Go to Tools, and choose "BitRate Calculator"
The bit rate calculator is an excellent tool to get an idea of the final File Size, as well as to adjust the bitrate to hit a target size.
Most of the info should be already be loaded from your setting in the main MeGUI window.
Double check the bit rate of audio, and the file type matches. (Output target) as well as the length of the film.
To estimate the file size for your current settings:
In the Video Bitrate, put in the bitrate you wish to use and MeGUI will estimate the fianl file size at those settings.
To specify a certain File Size:
Choose, "Total File Size" and manually put in what size you wish the file to be. MeGUI will then calculate what bitrate will be needed to hit that goal.
Also, you can experiement how the different containers will impact the final size.
For example, MP4 containers have slightly more overhead than a MKV. (usually just 1 or 2MB)
And MT2S containers will have a couple hundredMB overhead, depending on the length of the video.
Once you have decided what bitrate you need/want, go back to MEGUI main screen.
Press the "Config" to the right of "Encoder Settings" and put in the desired bit rate.
(if you did not choose to have it automatically set in the bitrate calculator)
If file Size is not a concern, put in any value you see fit or that I recommended earlier.
Step 4: Encoding the Video:
-->If you have chosen to compress the audio, all you need to do now is simply hit the "AUTO ENCODE" button in the bottom right corner.
1) In the windows that pops up, double check you container preference.
2) If all OK, Press Queue.
3) Then in the Queue Tab, press start.
When MEGUI is finished, you will have a playable MP4 or MKV, whichever you chose.

--> If you are keeping the original Audio Stream
1) Change the File Format to RAWAVC
2) Press the Enqueue button, in the Video encoding section of the main screen.
3) In the Queue tab, Press the Start button to begin encoding.
When MeGUI is finished, you will have a H264 file in the destination directory you choose.
3) In tools, go to Muxer, and choose MP4 or MKV (whichever you prefer)

Video Input = the H264 File you just encoded.
Audio = the original Audio Source.
4) You can also name the final output now, as well as additional settings such as languages.
5) Press the Queue button
6) Go to the Queue Tab in MeGUIs main windows, and press start to begin muxing the file.
Lossless Videos
Some may wish to have the BluRay content as a lossless file rather than downsizing or compressing the video.
To each their own, and fortunately for those who wish to do this, there is no extra software needed.
MeGUI has all the tools we need.
Simply follow the steps to extract the HD Video and Audio Streams as if you were going to encode the Video.
When the streams are extracted, go to Tools Menu & open MKV Muxer
In the Muxer simply add your video Stream and Audio Stream.
Mux them together and name the file.
You now have a lossless copy of the disc in the form of a MKV file
BeSPLIT (Optional)
There may be occasions when you want to cut part of a film. Either the beggining, or perhaps the credits.
If for whatever reason you wish to do this, this is how you use BeSplit.
1) From the Tools Menu, open AVS Cutter.
2) Browse to and open your AVIsynth Script.
3) You will now have you Script Preview Window open again.
You can play, Stop, Pause or seek anywhere you wish.
4)Once you find the point you want the video to start at, press the "Go To Frame" button and copy that frame number to the AVS Cutter Window.
5)Repeat for the frame number you want the video to end at.

6) Now that you have your start point, and end point Press the "Add Button"
7) Next Press the "Add cuts to scirpt" button. (This will add the cuts to the video itself.
8) Press 'Save Cuts File"
You can now close the AVS Cutter. We are done with the video part.
Next, Go to TOOLS, and choose Audio Cutter.

10) Here, the input file is the original, unaltered audio file.
11) Add the cut file, the one we just made in the previous step.
12) Name it something so you know which Audio File it is. Such "CutAudio"
13) Next Create Job, and then go to the Queue tab in MeGUI and start the job.
If you are recoding (or compressing) the audio, once you have your cut audio file is created
you can now add it in the MeGUI main Window, in Audio Input Section (in place of the original audio stream)
And thats it for BeSplit
If you wish to make a backup of your HD video, and followed the AVCHD guidlines, you can seem my AVCHD Disc Tutorial here:
AVCHD Disc (How to create)
Keep in mind that not only are Encoder settings important, but final file sizes as well. More info in the AVCHD tutorial.
I know this doesn't cover all the details, but it should cover the basic principle.
MeGUI can be quite overwhelming at first, and there is a lot to learn. Especially if you are just learning.
I hope that this actually helps make it easier to get the hang of, and not just more confusing.
If anyone has any questions about MeGUI that I have not covered feel free to ask and i will do my best to answer.
Link: http://www.sevenforums.com/tutorials/104382-video-encoding-x264-megui.html